Step 1: Introduction
This guide assumes that you already have your dish up, pointed and aligned correctly. If not, I suggest you look for another guide then come back to this. This guide is the same whether you are using a Hauppauge Nexus card, a Visionplus vp1020 or any other DVB card out there, just your drivers will change depending on the card. Step 1 consists of installing the MyTheatre program found here www.dvbcore.com. Install it as you would any other program and make sure you install the whole package, as you'll need it for all the little gadgets mentioned in this document.Step 2: Scanning Transponders
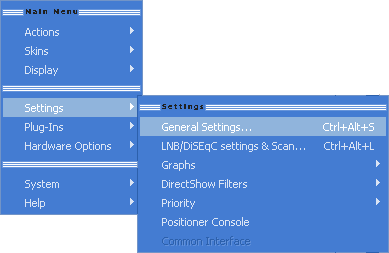
Now comes the fun part: You must configure MyTheatre to the Satellite using lof1 and lof2 frequencies. For all my examples you will see I am using NIMIQ 1 or Bell express vu low definition Satellite. Open up MyTheatre and right click on the video screen. This will bring up a popup menu. Go to Settings then "LNB/DiSEqC Settings and Scan" as shown in the image below.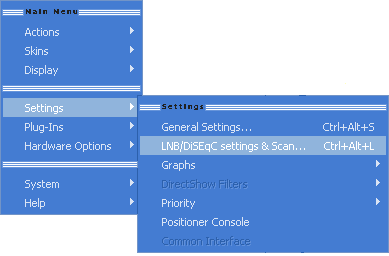
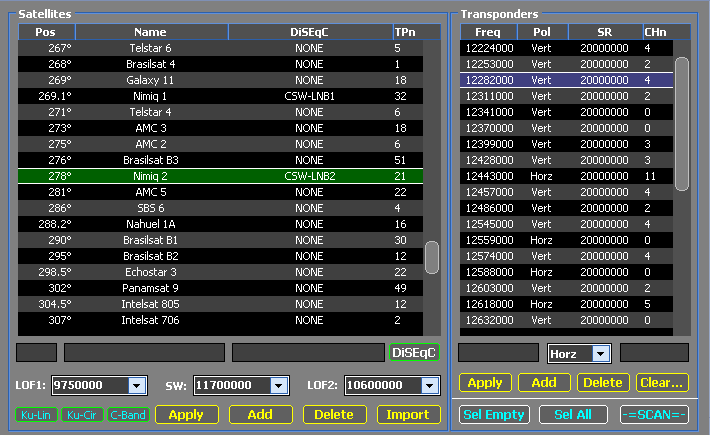
Once this is done you must select your satellite from the list of satellites shown below and fill out the LOF1/2 and SW settings. Those 3 values are used for a potentially available DiSEqC switch, allowing you to switch between different satellites you can receive. Set them to the following values: LOF1 = 9750000 , SW = 11700000 and LOF2 = 112500000. Don't forget to press Apply, or these settings won't be stored and a subsequent channel search will not return any channels. The LOF and SW values will be the same for every satellite.
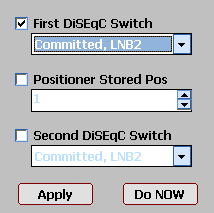
If you have a setup designed to receive from more than one satellite, press the DiSEqC button to get to the following screen:
 Here
you can configure the DiSEqC switch(es).
Here
you can configure the DiSEqC switch(es).
I'm using both Nimiq 1 and Nimiq 2, connected to LNB1 (or CSW-LNB1) and LNB2 (CSW-LNB2) respectively.
Press Apply to get back to the satellite selection screen.
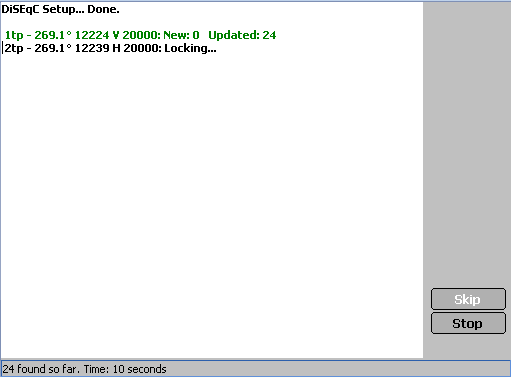 Since
I've set up MyTheatre prior to this channel scan, MyTheatre is telling me that
it found and updated 24 channels on transponder 1. If you're running the channel
search for the first time, those channels would be listed as New, rather than
Updated.
Since
I've set up MyTheatre prior to this channel scan, MyTheatre is telling me that
it found and updated 24 channels on transponder 1. If you're running the channel
search for the first time, those channels would be listed as New, rather than
Updated.
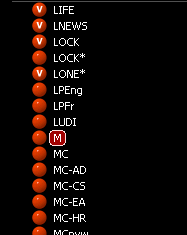
This pretty much concludes the Setup portion. If everything goes well you just
close this window once the scanning is complete and you'll see all your channels
in MyTheatre on the right hand side of the program. This is a small section
of my channel listing:
Part 3: Recording
Now for the part you have all been waiting for and if you're like me, the reason why you just bought your shiny new DVB card: First a little background on recording: MyTheatre scans the transponders for channel data called PIDS. PIDS are numbers that identify what audio stream goes with what video stream. For my Satellite there are many different audio and video streams. Your standard networks like ABC, FOX, CBS transmit video in a resolution of 544x480 with 192 kbit/s MP2 audio. The premium networks like TMN (known as M now) and your PPV channels are 704x480 and can carry more the one audio stream (in MP2 and AC3 format). Then there are the adult channels which are slightly better than your average SVCD, at 480x480 pixels using 192 MP2 audio. For this guide I will be using the channel TMN as it carries both an MP2 audio stream and an AC3 stream. I will walk you through how to record your stream of choice. You can record in 2 formats with MyTheatre: .pva (Hauppauge Nexus) and .mpg (Vision Plus cards). The PVA format is actually better for recording as it keeps more timing info. If you get a very good signal, recording in .mpg is not so much of a problem, but every now and then there's a hiccup in the reception, and you can more easily fix this when using PVA. Once you tune in to TMN, you can select the audio channel you want to listen to from the ??? menu:
OK so you have the show you want to record on TMN first thing is a little background on PID data depending on your version of MyTheatre you might have to do different things if your using a earlier version then 3.07 you may have to enter the AC3 PID manually, if you using a higher version chances are it will show you the AC3 PID with no extra work like in the image below.
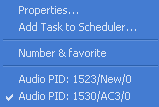 If
you're using MyTheatre 3.06 and earlier, you might have to enter the PID for
the AC3 stream manually. Newer versions will do this automatically for you.
If
you're using MyTheatre 3.06 and earlier, you might have to enter the PID for
the AC3 stream manually. Newer versions will do this automatically for you.
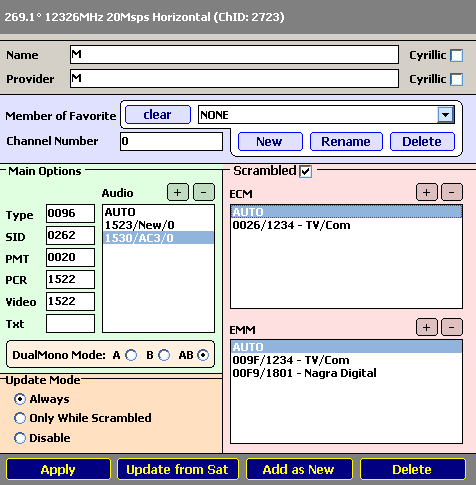 First
a little note on PIDS: As you can see the MP2 PID is 1523. MP2 PIDS usually
end in 23 while AC3 PID's usually end in 30, so if an AC3 PID wasn't found for
a certain channel and you know for a fact that this particular channel broadcasts
audio in AC3 format, you can add it manually: In the Main Options section
(the green part) there is a + button, press it and another window will open:
First
a little note on PIDS: As you can see the MP2 PID is 1523. MP2 PIDS usually
end in 23 while AC3 PID's usually end in 30, so if an AC3 PID wasn't found for
a certain channel and you know for a fact that this particular channel broadcasts
audio in AC3 format, you can add it manually: In the Main Options section
(the green part) there is a + button, press it and another window will open:
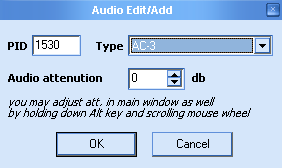
All we need to do is enter the AC3 PID as 1530 as explained above and select the track format as AC3 as shown on the image above. Then press OK to get back to the channel configuration screen, and press Apply to save the changes.
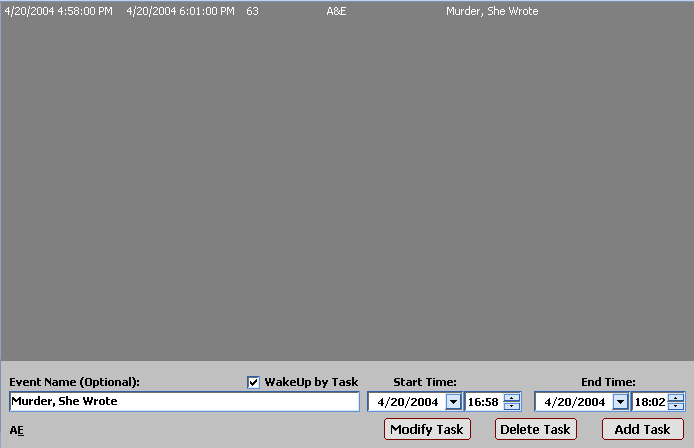
Part 4: The EPG and Adding Events
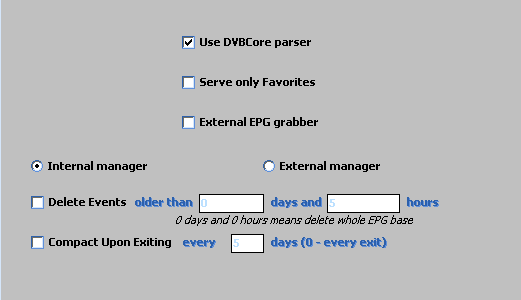
The EPG is a wonderful tool helping you to record a program when you will not be at your PC. To access the EPG in MyTheatre, there is one option in the settings that we have to turn off (it's usually on by default and will result in no channels being served to your EPG). Right click on your video window, select Settings in the drop down menu then go to General Settings: