AC3 to MP3 encoding in HeadAC3he
HeadAC3he combines a lot of well-known utilities like azid, lame and ssrc together
for direct AC3 -> MP2/MP3/WAV/Ogg Vorbis transcoding. In order to boost speed
there's a pseudo-one pass encoding mode where the AC3 will be decoded to a temporary
WAV file which will then be encoded to the destination format. During the AC3
decoding the signal peaks are recorded so the AC3 will not have to be parsed
first for peaks, then being decoded again applying the correct gain to not get
any overflows. This is especially effective on machines that have a fast I/O
subsystem (RAID;). Then there's another unique feature: Dolby Surround 2 coding.
This special mode codes the output in a way that Dolby Pro Logic II decoders
can separate the rear channels, while remaining completely compatible to regular
Dolby Pro Logic decoders. But let's get started now.
Start up HeadAC3he.
 Press
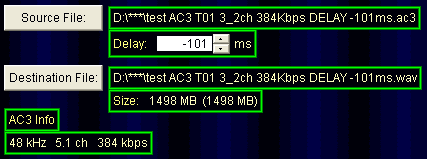
the Source file button and load your AC3 file. As you can see I demuxed this
AC3 with DVD2AVI so it shows me the delay I have to apply to the audio (the
DELAY -101ms part). HeadAC3he will automatically adjust the delay if you demux
in DVD2AVI. Below the Destination file you can also see the predicted filesize.
As I haven't setup everything properly yet the default is set to WAV output
so the file would be rather large (1498MB).
The AC3 info finally will show you the number of channels and the bitrate of
the AC3 file.
Then let's configure the output:
 Select
MP3 from the dropdown list and leave the 2-pass mode to the default (float)
for best quality. Note that while the default float mode is faster than regular
dumb 2 pass mode it will write a temporary file to your harddisk that can be
even bigger than decoding the AC3 to wav would be (because it's a float file,
32bit floats take up more space than 16bit ints). If this is not acceptable
to you you can go for the slower dumb 2 pass mode and you won't get a temp file.
Hybrid is a mix between the two.. the precision is a bit less accurate but it's
the fastest of all 3 modes.
Now press the options button to do some more setup work:
 Leave
the downmix type to Surround 2. Press the 2ch button here and everything will
be properly set up.
Then press the options button again to configure the MP3 output:
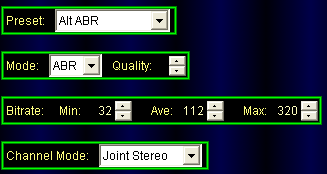
 Select
the Alt ABR preset, set the mode to ABR, then configure the minimum, maximum
and average bitrate (the former 2 don't really have to be changed.. just change
the average bitrate will do) and finally set the channel mode to Joint Stereo.
If you want to downsample for whatever reason, or to boost the volume of the
audio track you can use these two options:

Just check Resample to and leave it at 44.1KHz if you need to downsample (my
suggestion is: don't ever do it, there's no sense in paying respect to legacy
hardware), and activating the boost option will boost the overall volume of
your audio track.
Once you're done press the Start button to start encoding.
>> BACK
 Press
the Source file button and load your AC3 file. As you can see I demuxed this
AC3 with DVD2AVI so it shows me the delay I have to apply to the audio (the
DELAY -101ms part). HeadAC3he will automatically adjust the delay if you demux
in DVD2AVI. Below the Destination file you can also see the predicted filesize.
As I haven't setup everything properly yet the default is set to WAV output
so the file would be rather large (1498MB).
 Select
MP3 from the dropdown list and leave the 2-pass mode to the default (float)
for best quality. Note that while the default float mode is faster than regular
dumb 2 pass mode it will write a temporary file to your harddisk that can be
even bigger than decoding the AC3 to wav would be (because it's a float file,
32bit floats take up more space than 16bit ints). If this is not acceptable
to you you can go for the slower dumb 2 pass mode and you won't get a temp file.
Hybrid is a mix between the two.. the precision is a bit less accurate but it's
the fastest of all 3 modes.
 Leave
the downmix type to Surround 2. Press the 2ch button here and everything will
be properly set up.
 Select
the Alt ABR preset, set the mode to ABR, then configure the minimum, maximum
and average bitrate (the former 2 don't really have to be changed.. just change
the average bitrate will do) and finally set the channel mode to Joint Stereo.