Infinifilm/BoV Guide by OxP
I am sure that an Infinifilm title has passed through your hands with the massive amounts of extras on the same disc as the movie. You may have also noticed that they were accessable while watching the movie. This is all very cool, but how can this be reproduced in Scenarist? Now, there are of course other button over video guides, as this is, but they take a different approach to showing you what to do. I have taken the, what I believe to be, easier method of attaining the commands for the buttons, from Vobedit. If you find this too cumbersome, then by all means check out the other BoV guides available out there.
What you will need:Vobedit
Ifoedit
IFOUpdate
Sonic Scenarist
Preparation
To start off I would like to mention a few things briefly. This guide is based on an Infinifilm title, but its contents also apply to other button over video films. I would also like to note that you should know your way around DoItFast4u, DoCCE4U, and ReAuthorist. They are simple enough to use and only key notes about the programs will be mentioned in the guide. To begin, we open up DoItFast4U and right click on each of the ifos to analyze their structures. Just from looking at VTS_1, the main vts, it is obvious that we need not rip the first pgc as it has less subs than the second. All we need to do is rip the second one. The other vtses, I assume you know how to handle from experience...this is of course a more advanced guide. I sure hope you know your way around Scenarist atleast a bit as otherwise things might be difficult to follow. You can just rip and encode that second pgc and then create an scp via ReAuthorist. It will make a dummy for PGC 1 but we will correct that later.Making Button Over Video Subpictures Compliant
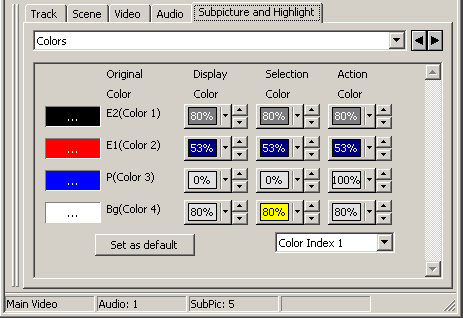
Load that script created by ReAuthorist into Scenarist and now we begin work. Our first order of business is to make sure that the subtitle streams are compliant for buttons. What does this mean? Well, for a subpicture to contain buttons there are certain requirements which it must follow. Requirements for a subpicture that can contain buttons:Finding Button Commands
We now have to find a first button to use as a template for the rest of them. So boot up VobEdit and lets have some fun. Some VobEdit tips:
[1][3][5]
Here is this same example with the second subpicture having two buttons.[1][3,4][5]
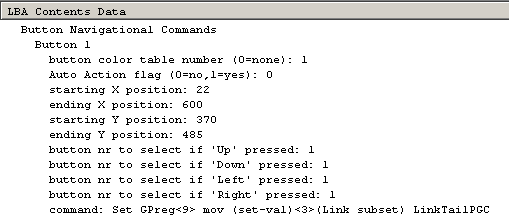
I suggest that you check the first two or three cell ids that contain buttons to get the general pattern as well as check out a cell id with two buttons in one subpicture. This is all to establish a good idea of what the pattern is so that the right extra is accessed when the button is pressed. Write down the command as you will need it later.Button Creation
Now we can go to the simulation editor and create the buttons. In my case there was a duplicate subpicture for every sub picture with buttons, so make sure to create the buttons for the proper one. Click the square button next to the pointer button on the top bar of the editor. Now create the button to cover a good part of the bottom. It does not really matter though, as we will change its size to match the original buttons. If you look at VobEdit, it tells the coordinates of the buttons. This can be inputted into the editor to make the buttons properly. Goto Subpicture and Highlight on the bottom and choose Buttons and select your button. Here you can set the sizes as seen in VobEdit.


Oh yes, one more thing. You will notice the two little green-blue boxes in the button bar of the Simulation Editor. One is wide and one is letterbox. You have to reset the button sizes for each separately. Annoying, I know. Have fun making those buttons. One more thing though, when you have two buttons on one subpicture make sure to go to Tools and hit Autoroute. This allows you to hit up or down on your remote to switch between the buttons.
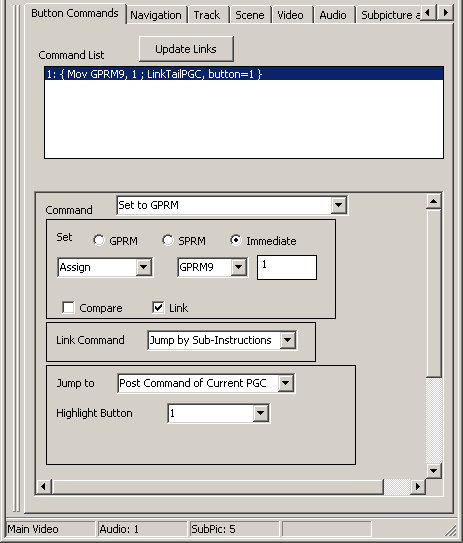
Now that we are done making the buttons time to set up the commands. Minimize the simulation editor and go to the scenario editor. You should now be looking at the pgc where you made your buttons. Select the first button and go back to the simulation editor. On the bottom portion you should see two arrows in either direction, hit the right one and a new tab will appear, labeled 'Button Commands'. Now we can use that information from Vobedit to make the button commands. In my case the command was as follows:Set GPreg<9> mov (set-val)<1>(Link subset) LinkTailPGC

Scenarist uses different terms to describe this as you can see from the picture to the right. If you have two buttons, you should set two commands one for each. Repeat this for each subpicture with buttons. After you have finished doing all this we have just a little bit more work to make sure that we have the same number of subpicture streams as the original.
This is not really spoken of too much in terms of Scenarist, but while we're using the program, why not? Open up Ifoedit and open the main movie VTS of your Infinifilm title. There should be two pgcs, one that is played without the Infinifilm feature and one that is played with it. In the top box expand the VTS_PGCITI tree and pick PGC2. If you scroll down a bit you should see something called "Sub-picture stream status". You can now view all three of the subtitle streams. There are two important pieces of information to look out for when viewing the data for each substream, those being the wide and letterbox values. A value of 0 corresponds to 0x20 and a value of 2 corresponds to 0x22. So we now know which subtitle address is used for each stream. We can now set all this information in Scenarist. In the Scenario Editor, select the title in which the PGC exists, for PGC 2, it would be Title 2. If you scroll down in the middle window you can see that there is an attribute labeled "Subpicture Availibitly". Set this to "Custom" if it is already not and check only Subpicture Streams 1 through 3 as our DVD only has 3 for this Title. Now click on the PGC(top portion) just below the Title and double click the box to the right of the box that says "Subpicture Attribute"(lower middle). You shall now see 3 subpicture streams here. Once again double click to the right of "Subpicture Attribute #0" and you shall see Wide and Letterbox. In my case 0 was used for wide for the first stream and 1 was used for letterbox in the first stream. Repeat this for all the PGCs and all of the streams.
After you have compiled your project, there is one more thing worth mentioning in the process, this being the IFOUpdate settings. In the Options drop down make sure that "Copy Color Table for Each PGC" and "Copy Audio and Subpicture Tables" are both checked. Well, after all that work, you can test out your newly reauthered Infinifilm title. A word of warning, I have had problems in Scenarist where it compiled, but the buttons did NOT work. So I must stress that you be very meticulous in the button creation process.