 If
you're using NuMenu4U to re-encode the menus, make sure Re-encode Menus Using
NuMenu4U Before Demuxing is checked. This will allow you to use NuMenu4U
to process menus prior to DIF4U processing.
If
you're using NuMenu4U to re-encode the menus, make sure Re-encode Menus Using
NuMenu4U Before Demuxing is checked. This will allow you to use NuMenu4U
to process menus prior to DIF4U processing.Full DVD Backup guide
This guide will teach you how to create a perfect backup of a DVD-9 retaining every asset present on the original disc. It's possible to remove audio or subtitle tracks and replace useless stuff like FBI logos by some blank video but in the end we're not going to change the basic structure of the DVD and thus risk the least amount of problems.
In this guide we're going to use three frontent tools that will make the whole process a lot easier: DoItFast4U (DIF4U), DoCCE4U (DC4U) and ReAuthorist (RA). DIF4U will rip and demultiplex VOB files for you. Additionally it will create DVD2AVI projects and AviSynth scripts to be imported into the MPEG-2 encoding program and it will correct any delays the audio files might have as compared to the video stream. DIF4U will then launch ReAuthorist, where you can configure the amount of compression for each video item (thus making your project fit on a single DVD±R disc), replace certain items by dummy clips, preview your video items and then launch DC4U to encode the video. DC4U is a frontend for CCE and allows you to easily batch encode projects and manipulate encoding settings before you actually start. After DC4U has finished you will return to RA, which will then create a Scenarist project file including all the video, audio and subtitle streams, all chapter positions and the whole navigational structure. Basically, all you need to do after RA is import the project, then compile the output, run IfoUpdate on the IFO files and you're ready for burning.
You will need the following software for this guide
DoItFast4U
DoCCE4U &
CCE or ReJig
0.4b+
ReAuthorist
ImgTool
IfoUpdate
Sonic Scenarist
Table of content
0: First time preparations
1: Preparation
2: Demultiplexing
3: Encoding
4: Reauthoring
5: Putting it all back together
6: Make the disc regionfree
7: Remove User option prohibitions
8: Final sector adjustments
8: Burn the DVD
Step 0: First time preparations
Install DIF4U, DC4U and ReAuthorist on your system. Then start up DIF4U.
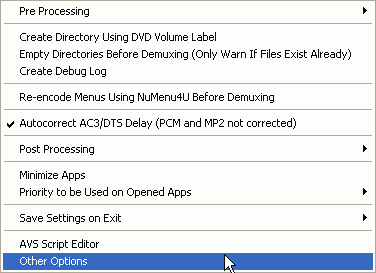
The first thing to do is configure DIF4U. All settings can be stored so you'll only have to do this for your very first project. Select Global Options from the menu to start configuring.
 If
you're using NuMenu4U to re-encode the menus, make sure Re-encode Menus Using
NuMenu4U Before Demuxing is checked. This will allow you to use NuMenu4U
to process menus prior to DIF4U processing.
I also strongly suggest that you check Create Debug Log. This log can help you or other people to identify any problems you might be having (so make sure you post it when you report DIF4U problems in the forums).
Autocorrect AC3/DTS Delay is checked by default and you should not change it or you risk having asynch video and audio in some cases.
In case you're using the computer while DIF4U is running, you might also want to check Minimize Apps so that they won't disturb your work, and set the Priority to be Used on Opened Apps to Idle so that the applications you're using while DIF4U is running will get the CPU time they require.
Then go to the PreProcessing options.
 The
first option you should check is Autocreate All Folders For this DVD.
This will ensure that each VTS set is put in its own directory and you can better
keep them apart. Of course, this is a preference which you have to be comfortable
with, but during the process so many files are created that I really think they
should be at least somewhat separated.
Also check Autodetect and Uncheck Duplicate PGCs so that in case of duplicate VOB IDs in multiple PGCs, those are not extracted and processed multiple times.
AutoSwitch VTSes containing angles to VobID Demux should also be checked, because multiangle VTS sets have to be processed by VOB ID. Note that for processing by VOB ID you should look into SceneAid.
Checking Autodetect Subtitles/Closed Captioning will automatically activate subtitle processing where subtitles are available.
Now go to the PostPost Processing - Launch External App section:
 Here
select ReAuthorist (Open Automatically) when using CCE as encoder, or
Rejig if you're using Rejig to re-encode your files.
Then make sure that in the Save Settings on Exit menu always is checked
so you won't have to make those settings again. Last but not least go into the
Other Options.
 The
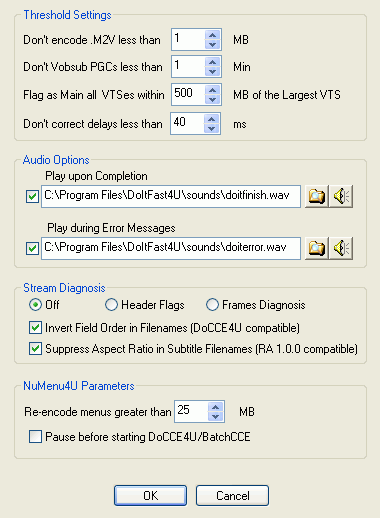
first two threshold settings should be left at their defaults, they decide when
a certain PGC won't be processed. CCE cannot encode very short clips so it makes
sense not to try in the first place. And if a PGC is really short it doesn't
make much sense to go looking for subtitles either.
Flag as Main all VTSes within is very useful for DVDs that contain episodes. Such DVDs often have different VTS sets having roughly the same size, one per episode. This threshold will determine when VTS sets are considered as being part of an episode discs. The way it's set now, if a VTS set is 500MB or less smaller than the largest VTS set, it will also be considered as a main movie VTS set (thus it will be encoded using the main movie settings)
Last but not least we have the Don't correct delays less than option. This indicates the cutoff for audio delay correction. Most people begin to hear audio displacement starting at 50-60 ms. If you're a perfectionist you would set this value to 0 ms to always perform a delay correction. Be advised though, this correction is only accurate to one AC3 frame which is more than 10ms by itself already.
The audio options should be self explaining.
The Stream Diagnosis settings allow you to select an alternative way to determine attributes of your video streams. Header flags uses the information found in the first GOP to determine if a source is progressive or interlaced, which works quite well especially for PAL movies. Frame Diagnosis is more complex but can be more accurate than Header Flags especially for NTSC content.
Also check Invert Field Oder in Filenames and Suppress Aspect Ratio in Subtitle Filenames. The former option takes care of DC4U setting the field order inversely to what DIF4U normally reports and ReAuthorist cannot handle the aspect ratio information in subtitle files, so that option should be checked to prevent a subtitle language of "Not specified".
Finally, the Re-encode menus greater than value allows you to select
after which treshold you want to re-encode menu files using NuMenu4U and checking
Pause before starting DoCCE4U/BatchCCE will pause NuMenu4U after opening
DoCCE4U/BatchCCE so that you have to chance of modify settings.
The next thing is first time configuration for DC4U so start up that program. Look in the lower part of the window and check if you see any errors like this:

Press OK, then browse to the path where CCE has been installed and select the cctsp.exe file. After selecting the file, DC4U will close and CCE will be started. Close CCE and start DC4U again.
Then select File - Settings from the menu.
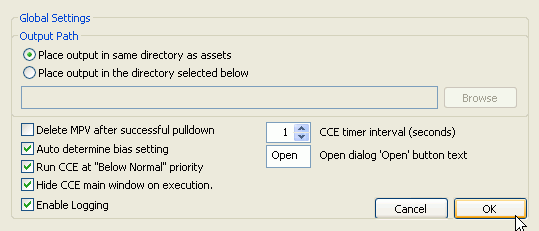 Leave
the first option as it is or you'll run into problems when using DC4U together
with DIF4U.
Then we have the option to delete mpv files (that's what CCE generates) after
applying pulldown which can be a good idea to save space (but if you have enough
space better be on the safe side and not use this option), then check Auto
determine bias setting and if you intend to use your PC while CCE is encoding,
make sure to also check the Run CCE at "Below Normal" priority.
Also check Hide CCE main window on execution so that if you're using
the computer while encoding, you won't have a CCE window that bothers you on
screen (or worse, you accidentally hit the wrong button and kill CCE) Last but
not least check Enable Logging so that you'll have a logfile that can help you
or other people problems you might be having (make sure you post it when posting
a problem report in the forums). If you're using a non English Windows version
also replace Open with whatever the open dialogue is called on your operating
system (for instance in German it would be Öffnen).
In case you had to set your CCE path manually, the next time you start up DC4U
you should no longer get an error message:

The last program to configure is ReAuthorist. After starting it the first time press the Settings button.
![]()
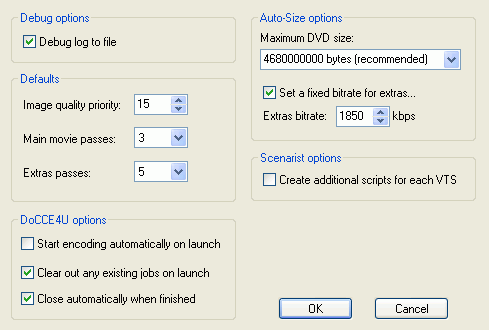 Debug
log to file should always be checked. In case something fails this log can
be used to identify your problem (so make sure you post it when posting a problem
report in the forum).
Leave the Image quality priority at its default and if you like you can change the number of passes. Note that the lower the bitrate, the more passes are required for good quality (that's why we usually use less passes for the main movie than for the extras). The defaults work reasonably well so normally I wouldn't touch the number of passes.
Start encoding automatically on launch can be used to proceed automatically after DIF4U has finished. Depending on your movie you'll want an intermission to check some settings, in which case you rather not check this option. The other two options can safely be checked (assuming that you're finishing one project before you start the next).
Then we have the size of a DVD. The default should be good, that way you're not taking any risks when the project turns out to be a few MBs larger than intended.
By default, ReAuthorist encode the extras at a given bitrate (which you'll set in the next field) and use the remaining space to use the highest possible bitrate for the main movie. In other words, Set a fixed bitrate for extras is checked. There's another way which you can use: Uncheck Set a fixed bitrate for extras and ReAuthorist will use the same compression factor for each and every movie item. Additionally, once you have come to the point where you have imported your project into ReAuthorit, you can change the compression factor of every movie item by using the lowermost slider below the preview window (more about this later in the guide). I prefer to use a fixed extras bitrate but maybe you see things differently.
Press OK to save your changes, then close ReAuthorist again for now.
In this guide we're going to put the DVD-9 Training Day, R2 having a total size of 7.5GB onto a single DVD-R disc. This edition of the movie contains 3 language tracks, a commentary track, multiple PGCs in the main movie VTS having different audio tracks than the main movie, 20 subtitle tracks and a lot of extras. If that doesn't scare you then I suppose you either don't know what the heck I am talking about and may be better off learning the DVD-R basics first or you reauthor The Matrix for breakfast in which case you most likely have no use for this guide ;) This training day is going to take you very far into DVD-R land and you're going to see things you have never seen before. But if you stick to the path you should be getting where you want to go to.
To begin with here's the directory listing of the DVD:
29.03.2002 03:47        16'384 VIDEO_TS.BUP

29.03.2002 03:47        16'384 VIDEO_TS.IFO

29.03.2002 03:44     1'968'128 VIDEO_TS.VOB

29.03.2002 03:46        30'720 VTS_01_0.BUP

29.03.2002 03:46        30'720 VTS_01_0.IFO

29.03.2002 03:44             0 VTS_01_0.VOB

28.03.2002 04:18 1'073'739'776 VTS_01_1.VOB

28.03.2002 04:18    58'195'968 VTS_01_2.VOB

29.03.2002 03:47        79'872 VTS_02_0.BUP

29.03.2002 03:47        79'872 VTS_02_0.IFO

29.03.2002 03:45     8'607'744 VTS_02_0.VOB

28.03.2002 04:20 1'073'739'776 VTS_02_1.VOB

28.03.2002 04:21 1'073'739'776 VTS_02_2.VOB

28.03.2002 04:22   881'936'384 VTS_02_3.VOB

28.03.2002 04:23 1'073'739'776 VTS_02_4.VOB

28.03.2002 04:24 1'073'739'776 VTS_02_5.VOB

28.03.2002 04:25 1'073'739'776 VTS_02_6.VOB

28.03.2002 04:25    39'243'776 VTS_02_7.VOB

29.03.2002 03:47        20'480 VTS_03_0.BUP

29.03.2002 03:47        20'480 VTS_03_0.IFO

29.03.2002 03:45             0 VTS_03_0.VOB

28.03.2002 04:26   658'708'480 VTS_03_1.VOB
VTS_02 is obviously the main movie VTS set as it's the largest one. In this guide I'm going to show how to transcode each video item, but in some cases you might prefer to only encode the main movie. CCE can give you good video quality using a bitrate of 2500 kbit/s or higher. If you add the bitrate of the audio tracks you're going to keep to that and multiply this by the length of the movie in second you have an approximation of the size of the main movie (add about 100-150MB for the muxing overhead to get a more realistic result). If you add the size of the extras (VTS1 & VTS3 in this case, and don't forget about VIDEO_TS.VOB) and you're still below the size of a DVD then you may not want to bother doing the extras as well.
The best way to begin is create an ISO image of the DVD and mount this as a virtual drive. That way we'll always have every file we need available right on our harddisk and won't have to insert the original DVD again. It also saves us from embarrassment of accidentally deleting a file you'd still need as all the files in the image are read only.
Now we literally have to rip our movie to pieces. In less martial terms we're going to separate audio, video and subtitles and process them independently of each other.
Now let's get started for real. The first thing you'll have to do is select
a working directory. This is the directory where all the demultiplexed files
will be stored (alternatively you can create a new folder, right click on it
in Explorer and select DoItFast4U into this directory).
 Create
folder for this VTS, if checked, will create a new folder and demux the currently
selected VTS into this folder. It's a per VTS setting so you can decide to put
multiple VTS sets into the same folder by unchecking this option for the VTS
you'd like to go together (they'll be placed in your working directory). Note
that if you followed the first time setup instructions above, this checkbox
will be set already and you shouldn't have to touch it. HDD Demux would have
to be used if you previously ripped the whole DVD to a directory on your harddisk
(not suggested!) in which case you'd have to select the directory containing
the ripped files as working directory. Then we have demux by VOB ID or Cell
ID. The latter should never be necessary and the former is only required in
very special cases (I'll come back to this option a bit later).
The next thing we're going to look at is the mandatory section:
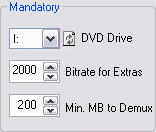 (Virtual)
DVD Drive is the drive letter of your mounted ISO image. Then you can select
a bitrate to be used for the extras contained on the DVD (do not go above 2000
or below 1500 for reasonable quality). Minimum MB to demux allows you to not
process VTS sets that are below a certain size (in this case if there were a
VTS set smaller than 200 MB you wouldn't bother processing is as the possible
space gain would be outweighed by the invested time).
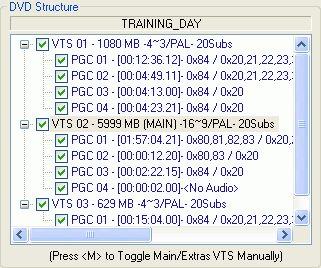 DIF4U
will also give you a global overview of the disc, including available VTS sets,
PGCs, their lengths, audio track IDs, number of subtitles, subtitle track IDs
and aspect ratio. If you need even more info, right click on one of the VTS
lines to open the corresponding IFO in IfoEdit.
By default all VTS sets including all associated PGCs will be checked. If a VTS set were smaller than the threshold we set above (200MB in our case) it would be unchecked and hence not be processed at all.
If you think that a certain PGC should not be processed as well you can also uncheck them now.
From this point on all our settings apply to the currently selected VTS set, so come back to this selection and select the next VTS set when you're done configuring. Below I'll illustrate my setup for the main movie VTS set (VTS 02).
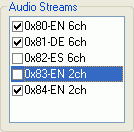 As
we were able to see in the previous screenshot, the main movie does only contain
4 audio tracks, 0x80, 0x81, 0x82 and 0x84, those being 6ch English, 6ch German,
6ch Spanish and 2ch English (the commentary track). The 5th track (0x84) is
used for PGC 03. Since I don't speak Spanish and don't care about the commentary
so much I unchecked 0x82 and 0x83 which means my main movie will only have two
audio tracks, PGC 2 will only have one audio track (0x83 is unchecked) and the
audio track for PGC 3 is preserved.
Note that when you configure the other VTS sets, all but the 0x84 audio track will be grayed out. This means that those tracks are not present in those VTS sets (if you check the previous screenshot again you'll see that VTS 1 and VTS 3 only contain one audio track: 0x84).
Then let's also configure the subtitles:
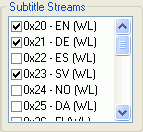 Here
I once again only keep those languages I actually understand. Note that the
same as above applies, PGCs 2-4 contain less subtitle tracks but that doesn't
bother you (if there's no 0x21 subtitle track in PGC 2 then your project will
of course not have such a subtitle track either).
Then we have the optional switches:
 The
upper line concerns field operations, an option that is better left automated
and the 3 options are grayed out if DIF4U is making that choice for you. In
case you're dealing with a PAL project and already know which VTS sets and PGCs
are interlaced you can uncheck that button for complete VTS sets and choose
an option manually. For instance, my example has VTS1 and VTS3 purely interlaced,
so there I could uncheck AutoDetect NTSC Video Type and check Deinterlace.
Of course, this requires that I actually know which VTS sets are interlaced
and which not, which you usually might not (you can use a software DVD player
to get an idea but those perform on the fly deinterlacing so it will be rather
hard to spot). When in doubt, use the AutoDetection (I'll explain a way to detect
and properly handle interlaced PAL content later on). The lower line concerns
the subtitles. If you have multiangle DVD you might want to check All Angles
to make sure you get all the subtitles. Then we have Vobsub PGC. If you check
this you'll get subtitles (the ones you have previously selected), if you don't
check it you'll get no subtitles (note that if you activated subtitle detection
in the options DIF4U will automatically make the proper selection for you to
get subtitles).
If your movie has closed captions also check the +CC option.
This is all you have to do for one VTS set. Now repeat this procedure for the other two VTS sets present on the DVD.
Before we start the operation let's get back to VOB ID demuxing for a second. I have written a small guide giving some examples when and when not to demux by VOB ID. Keep in mind that the demux settings are per VTS, so you have to go through each VTS set and decide if VOB ID demuxing is required. In case you're dealing with a movie similar than Austin Powers (15 frame layer breaks, re-used cells in PGCs) I have written some notes on how to handle such movies.
Now that we have configured everything let's rock. Press the Do It! button and let DIF4U do its thing.

Note than when using ReJig as encoder, the encoding will be done automatically so eventually you'll see a screen like this:
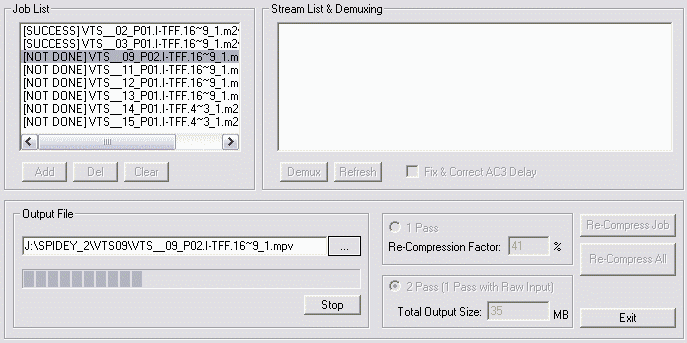
Once DIF4U has finished, you can proceed directly to step
4.
Step 3: Encoding
When everything goes according to plan, ReAuthorist should be automatically started. First note that the same folder you chose in DIF4U is used as the source folder:
![]()
Then note a rather small element: the VTS selection. It allows you to select one VTS set to configure.
![]()
Let's have a look at VTS2:
 As
you can see, the first two audio tracks will be kept, just like I set in DIF4U.
The 3rd and 4th audio track will be replaced by a dummy track to retain the
original DVD structure whereas the 5th audio track is once again present.
 The
same can also be seen for the subtitles. The 3rd subtitle track (Spanish in
the original DVD) is left out and replaced by a dummy to ensure that the 4th
(Swedish) subtitle track is in the correct position. All other subtitles have
been removed (note that the last subtitle track is always an actual subtitle
track).
Note that on the left of the subtitle streams you have the size of the currently
selected VTS set:

Now let's have a look at the PGCs of this VTS set:
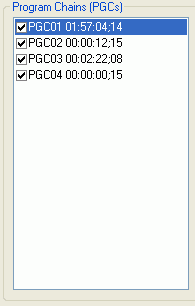 As
in the original we have 4 PGCs.
By unchecking a PGC you can replace it by a short dummy clip. This is almost equivalent to stripping in IfoEdit, but it preserves the DVD structure intact so you won't have to worry about navigational problems when watching the movie.
Upon selecting a PGC in the previous screen you can change certain encoding
settings for a PGC.
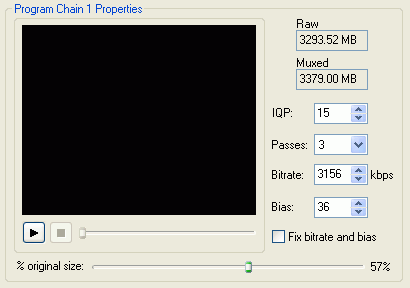 Note
the small preview window and the playback controls and slider below it (in the
shot the playback control slider is grayed out, it will only become active upon
pressing the play button). You can use that preview to identify your source
videos.
On the right note the size of the raw video stream, and video, audio and subtitles multiplexed together. As you can see, the main movie is encoded using 3 passes, according to our first time ReAuthorist configuration.
Also note the slider at the bottom. Using it you can vary the size of the currently selected PGC. By default ReAuthorist encodes all extras at the same bitrate and thus Fix bitrate and bias setting will be checked and the % original size slider will be deactivated.
If you're not using a fixed bitrate for the extras you can use that slider
to change the compression factor of each video item. The higher this percentage,
the better the quality, with 100% meaning that this video item is not being
re-encoded.
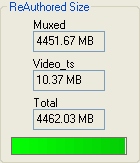
In the upper left of ReAuthorist you have the final output size. As long as the slider is green you're okay, as it changes color you'll have to decrease the original size percentage of one or multiple PGCs or your project will no longer fit onto a DVD-R.
Before we go on let me quickly explain the Auto-Size button.
![]()
Pressing it at the beginning will calculate the bitrate for the main movie assuming all the extras use the global bitrate you set in the settings. If you exclude some PGCs, or if you change the mode to be able to resize movie items manually, you'll have to press it again to re-calculate bitrates for your project.
Once you've configured everything press the Encode button
![]()
DoCCE4U will be started and your project file should be loaded.
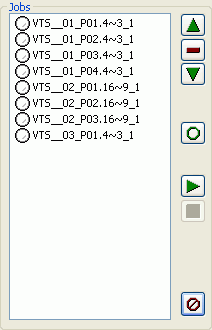
Before pressing the start button (which incidentally looks like a play button)
we have to do one last thing in case we're dealing with a PAL project. If you're
dealing with an NTSC project you can skip these proceedings.
As previously mentioned, PAL material can be interlaced and currently DIF4U
cannot automatically determine this reliably. So we'll have to do this the hard
way. Start Windows Explorer and go to the directory where the AviSynth scripts
(.avs) reside (they will be in D:\TRAINING_DAY\VTS01, D:\TRAINING_DAY\VTS02
and D:\TRAINING_DAY\VTS03). The right click on such a file and select - Open
with...

Then select Windows Media Player. A window will open where you'll see the movie playing. Look for interlacing artifacts which you can easily identify by horizontal lines that go through the picture (it kinda looks like holding a comb in front of your screen). If you detect such artifacts you have two options: The first is to deinterlace the picture, thus hopefully getting rid of all those artifacts. The 2nd option is to encode the PGC as it is - interlaced. The former slows down encoding somewhat but progressive encoding is more effective than interlaced.
Here's what you have to do for option 1:
Double click on the respective AVS script. Here's an example of a script (this is for AviSynth 2.51 or AviSynth 2.08, if you have AviSynth 2.07 or earlier the script will look slightly different).
import("C:\Program Files\DoItFast4U\new.avs\addaudio.avs")
LoadPlugin("C:\Program Files\DoItFast4U\new.avs\mpeg2dec3.dll")
Mpeg2Source("VTS__01_P01.4~3_1.d2v")
AddAudio()
ConvertToYUY2()
Now add the following following two lines:
LoadPlugin("C:\Program Files\DoItFast4U\new.avs\decomb.dll")
FieldDeinterlace(blend=false)
In the end your script should look like this:
import("C:\Program Files\DoItFast4U\new.avs\addaudio.avs")
LoadPlugin("C:\Program Files\DoItFast4U\new.avs\decomb.dll")
LoadPlugin("C:\Program Files\DoItFast4U\new.avs\mpeg2dec3.dll")
Mpeg2Source("VTS__01_P01.4~3_1.d2v")
FieldDeinterlace(blend=false)
AddAudio()
ConvertToYUY2()
Now save the file and repeat this procedure for every interlaced PGC then proceed to encoding.
The 2nd option consists of changing the source parameters in DC4U. When you double click on one of the jobs on the left side of the DC4U window you'll notice that the right side of the program becomes active.
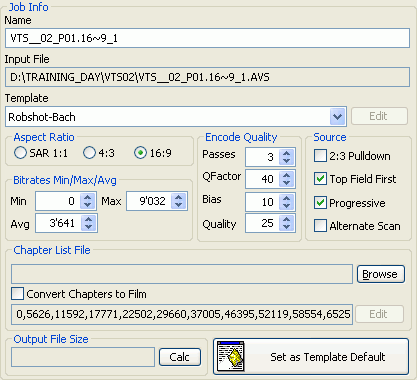 Unless
you really know what you're doing you should change any of those options. Note
that the Aspect ratio has been set in accordance to what DIF4U figured out,
and that the bitrate and number of passes have also been set. The other Encode
Quality options have been automatically set, along with the chapter positions
When dealing with interlaced content, the Source parameters are of interest to you. The first one applies to NTSC material only, but Top Field First, Progressive and Alternate Scan apply to interlaced encoding.
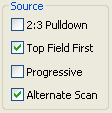 These
are my settings for an interlaced PGC. As the source is interlaced you have
to uncheck Progressive. Then check Alternate Scan which applies to most interlaced
PAL sources.
To make sure that your parameters are correct, BitrateViewer can help you. Just
open up the m2v file corresponding to the job you're currently editing (it has
the same filename). Here are the parameters for my interlaced PGC:
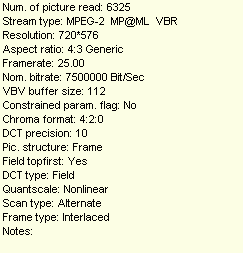 As
you can see we have Field topfirst: Yes so Top Field First should be
checked in DC4U. Then we have Scan type: Alternate so Alternate Scan
should be checked. Last but not least we have Frame type: interlace so Progressive
should be unchecked.
To make the changes sticky press the Replace button, and repeat this procedure for every interlaced PGC.
![]()
![]()
DC4U will perform all encoding steps for you and will even take care of 3:2 pulldown after encoding.
In case you have used ReJig, you'll have to start up ReAuthorist and point the Rip Folder to the folder where DIF4U put your files (in our example: D:\TRAINING_DAY).
Once DC4U has finished processing, close the program and return to the still running ReAuthorist. Now press the Author It ! button.
![]()
This will most likely take a bit of time. Once it's done you'll see the following screen:
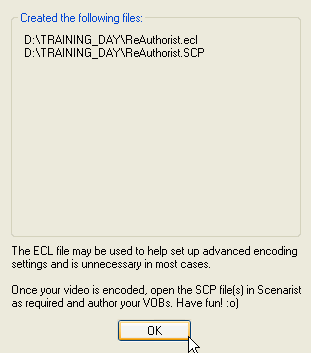 When
using ReJig as encoder, there's one manual step that has to be done now. ReAuthorist
assumes it is encoding the video and hence assumes that the files to be authored
will be named if they were created by ReAuthorist (actually DoCCE4U but ReAuthorist
controls DoCCE4U's output so it's all the same). However, using ReJig those
files are named differently. If you look into the folders DIF4U has created
you might see something like
VTS__01_P01.4~3_1.M2V
VTS__01_P01.4~3_1.mpv.m2v
VTS__01_P02.4~3_1.M2V
VTS__01_P02.4~3_1.mpv.m2v
With the .mpv.m2v files being smaller than the .M2V files. The .mpv.m2v files have been transcoded by ReJig, but ReAuthorist expects them to be named .mpv, hence you have to rename all the .mpv.m2v files to just .mpv. The two .mpv.m2v files shown above would thus become:
VTS__01_P01.4~3_1.mpv
VTS__01_P02.4~3_1.mpv
Note the path of your ReAuthorist.SCP file, you're going to need it. This file
contains all the magic of ReAuthorist. It will save you the tedious job of reconstructing
the DVD structure manually in Scenarist. When you start Scenarist, select New
from Script.. in the project manager.
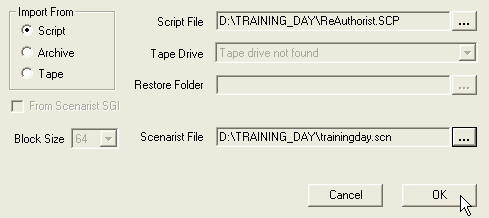 Make
sure Import From Script is checked, select your ReAuthorist.SCP file and don't
forget to set a Scenarist file (that file will be created from the script file)
then press OK.
This will take a long while. If you're not using your PC, you'll see that Scenarist
is busy importing various files and shows you the progress in a small part of
the window in the lower left. As soon as you start using another program, Scenarist
seems just to sit in the background and behave as if it had crashed. Don't be
fooled though, it's still processing and if you listen to the noise and LED
of your HD you know it's still active.

Once Scenarist has created the project go to the track editor and verify that all tracks have been properly created. If ReAuthorist doesn't find a file (because it hasn't been encoded or because something else went wrong), you'll notice a placeholder symbol:

Such a track may contain certain tracks but it doesn't contain video. A track that is okay will look like this:

Just in case you can go into each track (just double click on the gray rectangle) and see if all audio and subtitle tracks are present.
If everything is in order you can go to the Layout editor:
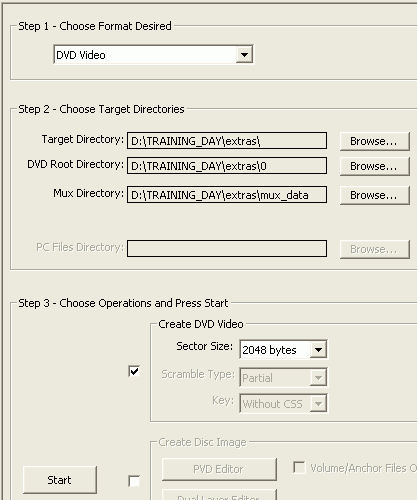 Target
Directories should be filled out according your selections when you created
the project.
All that remains to be done is check the first checkbox in the Step 3 - Choose Operations and Press Start section, then press Start and wait for completion.
Step 5: Putting it all back together
Scenarist has created the following files for you:
   13.05.2003 19:40        8'192 VIDEO_TS.BUP

   13.05.2003 19:40        8'192 VIDEO_TS.IFO

   13.05.2003 19:40        30'720 VTS_01_0.BUP

   13.05.2003 19:40        30'720 VTS_01_0.IFO

   13.05.2003 19:41   414'593'024 VTS_01_1.VOB

   13.05.2003 19:41        75'776 VTS_02_0.BUP

   13.05.2003 19:41        75'776 VTS_02_0.IFO

   13.05.2003 19:44 1'073'713'152 VTS_02_1.VOB

   13.05.2003 19:48 1'073'571'840 VTS_02_2.VOB

   13.05.2003 19:51 1'073'635'328 VTS_02_3.VOB

   13.05.2003 19:53   797'650'944 VTS_02_4.VOB

   13.05.2003 19:53        20'480 VTS_03_0.BUP

   13.05.2003 19:53        20'480 VTS_03_0.IFO

   13.05.2003 19:53   239'222'784 VTS_03_1.VOB
In the VIDEO_TS folder that DIF4U created you'll have the following additional files (the ones that weren't touched by any of the involved programs):
   29.03.2002 03:47    16'384 VIDEO_TS.BUP

   29.03.2002 03:47    16'384 VIDEO_TS.IFO

   29.03.2002 03:44 1'968'128 VIDEO_TS.VOB

   29.03.2002 03:46    30'720 VTS_01_0.BUP

   29.03.2002 03:46    30'720 VTS_01_0.IFO

   29.03.2002 03:44         0 VTS_01_0.VOB

   29.03.2002 03:47    79'872 VTS_02_0.BUP

   29.03.2002 03:47    79'872 VTS_02_0.IFO

   29.03.2002 03:45 8'607'744 VTS_02_0.VOB

   29.03.2002 03:47    20'480 VTS_03_0.BUP

   29.03.2002 03:47    20'480 VTS_03_0.IFO

   29.03.2002 03:45         0 VTS_03_0.VOB
The next thing is copying all the files together to a common directory (I suggest you create a new directory for that). Note that if you compare the above two directory listings we have some overlap. The VIDEO_TS.* and all .IFO and .BUP files are available twice. Copy ALL!!! original files (the ones dated 03/29/2002) and complement them with all .VOB files that Scenarist generated (those files are dated 05/13/2003). Your directory should now contain the following:
   29.03.2002 03:47        16'384 VIDEO_TS.BUP

   29.03.2002 03:47        16'384 VIDEO_TS.IFO

   29.03.2002 03:46        30'720 VTS_01_0.BUP

   29.03.2002 03:46        30'720 VTS_01_0.IFO

   13.05.2003 19:41   414'593'024 VTS_01_1.VOB

   29.03.2002 03:47        79'872 VTS_02_0.BUP

   29.03.2002 03:47        79'872 VTS_02_0.IFO

   13.05.2003 19:44 1'073'713'152 VTS_02_1.VOB

   13.05.2003 19:48 1'073'571'840 VTS_02_2.VOB

   13.05.2003 19:51 1'073'635'328 VTS_02_3.VOB

   13.05.2003 19:53   797'650'944 VTS_02_4.VOB

   29.03.2002 03:47        20'480 VTS_03_0.BUP

   29.03.2002 03:47        20'480 VTS_03_0.IFO

   13.05.2003 19:53   239'222'784 VTS_03_1.VOB
Once this has been done start up IfoUpdate.
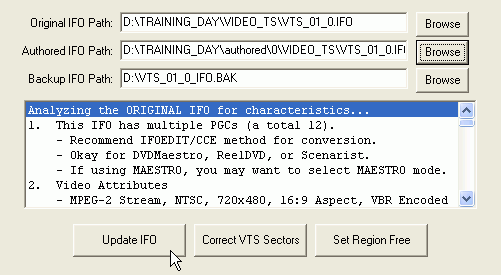 Select
the path of the original IFO file to be updated under Original IFO Path
(DIF4U put this in the VIDEO_TS folder for you, it's the same file as on your
DVD disc), then set the Authored IFO Path to the corresponding IFO file
Scenarist has created for you (you'll find it in the path where Scenarist wrote
the output to, there'll be a 0\ in the pathname as shown in the screenshot),
make sure there's a valid Backup IFO path but before you press Update
IFO let's have a look at the options first:
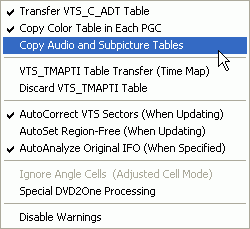 Use
the settings as shown on the left, then press Update IFO and press OK when asked
for confirmation.
Repeat this process for every non dummy VTS_0x_0.IFO file Scenarist has generated
for you (in this case one per VTS so 3 in total for the movie in question: VTS_01_0.IFO,
VTS_02_0.IFO and VTS_03_0.IFO. What are the dummy IFOs that you don't have to
update? If you have unchecked a VTS set in DIF4U, ReAuthorist will create an
empty VTS set at its position so that you will not have to rename the output.
Let me give you an example to outline this: The movie I'm using to describe the procedure has 3 VTS sets. If I were to uncheck VTS1 in DIF4U and do the whole process again, the Scenarist output would contain a VTS01 set (files named VTS_01_*) which is very small. This is a dummy VTS that was only created so that your reauthored VTS02 and VTS03 are "at the right place"). When you copy the files together, you'll notice that you'll already have VTS_01_* files from the VIDEO_TS directory that DIF4U created, and will hence not copy the VTS_01_* files that Scenarist has created to the common folder before you run IfoUpdate). Last but not least: NEVER!!! update VIDEO_TS.IFO!!!.
Now it's best to check out if your disc works. To do that use a software DVD player like PowerDVD. A problem that sometime occurs is that the wrong audio track is playing. If this should be the case, open the corresponding IFO file in IfoEdit, go to the VTS_PGCITI section and select the appropriate PGC.

As you can see the audio stream status increases by increments of 256. If instead of the first stream the 2nd one is being played set Audio stream 1 status to 33024 (and Audio stream 2 status to 32768) and save the IFO again.
Now press Update IFO. Once this has been done you're basically ready for burning. However, you may want to remove certain user prohibitions (as in not being able to change the audio track via the appropriate button on the remote while watching the movie), make the disc region free, or strip out subtitle and audio channels that you have no included in the re-authored project. You can find all these steps here.
Special thanks to Eyes'Only for motivating me to write this guide and endure my constant pestering when DIF4U didn't work the way I expected it to. Thanks also to Trilight who has been an inspiration for my work on many occasions.
This document was last updated on April 12, 2009