VCDs and SVCDs with chapters
Thanks to VCDImager and a few nice GUIs to create XML scripts for it we get a lot of VCD and SVCD features for which commercial tools had to be used earlier on. But now you can dump I-Author and ride the open source wave ;) We'll start our series on VCDImager with VCDEasy, one of the earliest GUIs for VCDImager and a still a very easy one to use. At this moment it does not support menus but other than that it supports image creation, chapters and even burning using CDRDAO, an open source CD burning program.
But let's get started, shall we?
You will need the following software for this guide:
Step 1: Preparing the sources:
Of course you will need a multiplexed VCD or SVCD stream that's specs compliant. You can use any of my (S)VCD guides to create such a video stream. If you can you should activate the option to get closed GOPs to make chapter navigation easier and more accurate. In TMPG you will find this option by clicking on Setting in the main screen, then going to the GOP Structure tab and finally checking Output bitstream for edit (Closed GOP).
Step 2: Fetching the chapter points
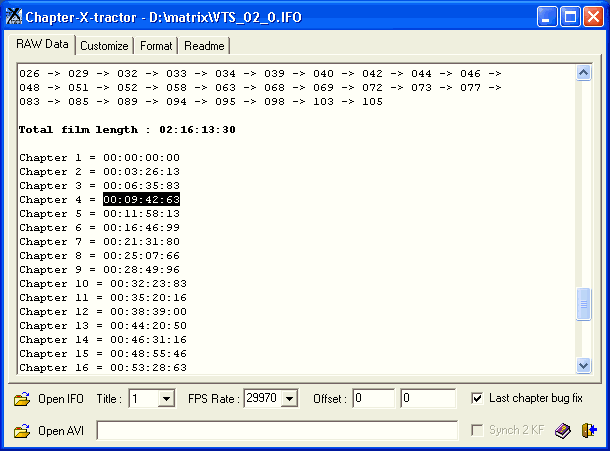
I'm assuming you want to re-create the chapter structure present on your DVDs. In order to do so you will need the largest .ifo file from the DVD disc. Then start ChapterXtractor.

Press Open IFO, select your .ifo file then wait for a couple of seconds as the file gets processed and you see a lot of stuff scrolling by. Once it's done click on the format tab:

Select SVCD from the Presets dropdown list, then mark the whole window content with your mouse, right click and select copy.
Step 3: Setting up your chapters
Start VCDEasy.
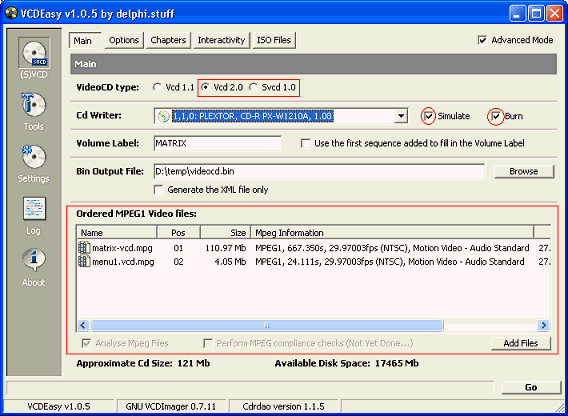 First of all you have to select the type of your video. To create a VCD you have to select Vcd 2.0, to create a SVCD you have to select Svcd 1.0
Then select your CD recorder from the dropdown list. Also check simulate and burn in order to first simulate the burning procedure. If you know that CDRDAO works fine on your system you can uncheck Simulate and then once you press the Go button the disc will be directly burned. In order for the burning to work you need a working ASPI layer. Get the ASPICheck program and if it doesn't find a working ASPI layer you have to download ForceASPI, install it then reboot and try again.
In the Volume Label box you can give the disc a name (not really important imho as most standalones won't even show it), then select an output path for the disc image (which will be created prior to burning in any case so make sure you have enough space ready).
Last but not least, drag and drop your video streams from windows explorer into that screen so that they will be listed in the part of the screen that I marked with a red rectangle. By default all files will be checked for compliancy first so you won't run into any nasty surprises once you've burned your disc(s).
Depending on your player you must activate PBC (Playback Control) by pressing the Option button and checking the first option. I would suggest you turn this option on by default and only turn it of if the chapters don't work for you. Last but no least check Advanced Mode in the top right or you won't get to see th chapter functionality.
Next click on the Chapters button.
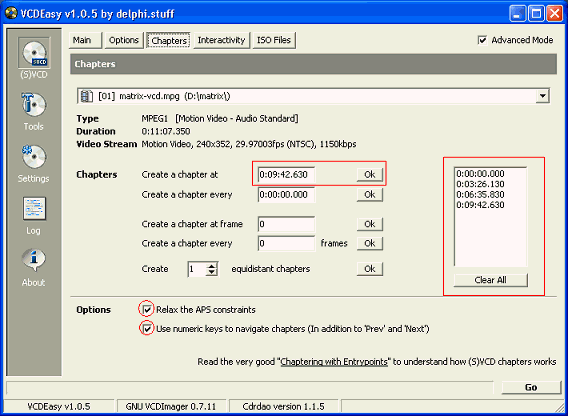 All you have to do now is right click over the area I marked with a large red rectangle, select paste ChaterXtractor (RAW data) and you'll get to see the following:
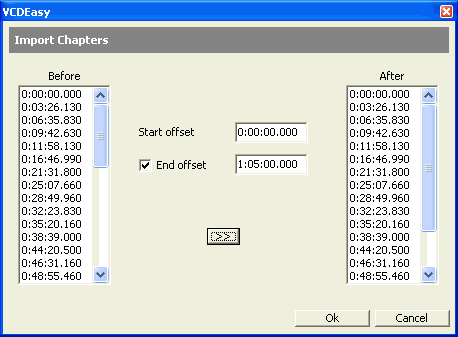 On the left side you see all the imported chapters. For the first disc make sure the start offset is 0:00:00.000 and set the end offset to the playlenght of your first disc, then press the >> button followed by OK. If you have chapters outside the lenght of your movie file they will be discarded and you'll get a warning message.
Alternatively you could paste chapter info from SmartRipper (if you used SmartRipper to rip), in this case select Past SmartRipper after right clicking for the first time.
If you create 2nd or 3rd disc make sure you select the right start and end offset (start offset for the 2nd disc would be the end offset for the first disc and the end offset for the 2nd disc would be the playlenght of disc1 and disc2 together, etc).
Or if you prefer to do chapters manually use the other chaptering options that the GUI offers you, they are pretty self explaining.
Back in the main chapter screen make sure the 2nd option is checked so that you can use the numerical keys on your remote to select chapters. The relax APS constraints should only be turned on when you run into problems during the creation of the image (the Log will say something about APS once you pressed the Go button). Now lets set up the burning program: Go to settings, CDRDAO:
 Select your CD burned from the Cd Writer dropdown list. The first time I used VCDEasy the program didn't burn but aborted with an error saying my drive was incapable of burning and it later turned out that I had accidentally selected my DVD-ROM as a burner which of course can't work ;)
You only have to configure the Cd Reader if you plan to rip VCDs or SVCDs (not part of this guide).
Last but not least let's to to the (S)VCD Player options:
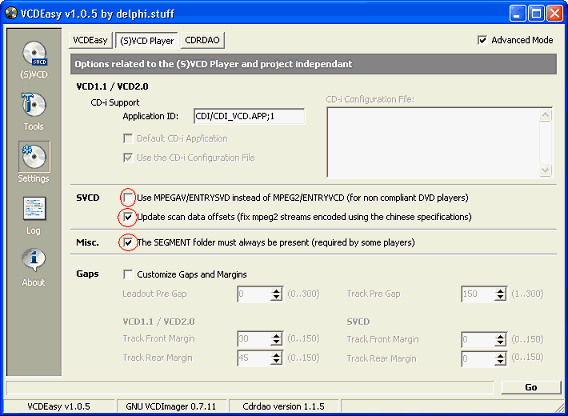 Make sure that the Segment option in the Misc. section is always turned on.
If you're making an SVCD and you're getting warnings during the import of your mpg files check Update scan data offsets.
Furthermore.. if your player should refuse to read the disc but you know it's SVCD capable and it works on your pc based player then check Use MPEGAV/ENTRYSVCD instead of MPEG2/ENTRYVCD because your player wrongfully assumes that the video files are contained in the MPEGAV directory (VCD standard) instead of the specs compliant MPEG2 directory.
And that's all there is to it. Now press Go and hopefully everything will work alright. If you get some warnings in the log it's not really a reason to worry already... I got a bunch of them myself but the disc still worked fine.