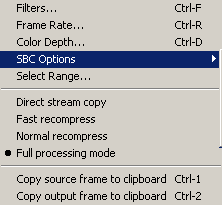
 This is going to be our playground for the next few minutes at least.
Encoding in Nandub
SBC is a two pass process, the first pass encodes your movie at the maximum bitrate DivX allows (6000kbit/s) and analyzes the output for several parameters. Amongst these is the "quality" which is stored in bits 1-5 in each frame. This makes values between 0 and 32 possible. This value is the compression level the codec uses to compress a frame, like 2x or 3x, and it's directly related to the size of the frame (the higher the number the smaller the frame). Generally values between 2x and 32x are being used, as the decoder is unable to decode frames encoded at 1x. Fast Motion uses only values 5x and higher therefore limiting the quality you can have when using purely high motion whereas low motion goes up to 2x. But clearly, it won't use this compression settings for all the frames since this would lead to an excessive bitrate use. Other values which are being stored are size of frames and the weight of the chroma/luma components.
Note: The new releases have quite a lot of new interesting features. Please visit the Nandub forums where you can find many interesting discussions about these features and do not forget to read the readme file carefully as well. Many thanks go to all the nice people active in these two forums whose relentless testing made it possible to get even better results. Also thanks to _nn_, Myth and Phreak and all the other people taking their time to help people out in these forums. Many thanks to Koepi who took the time to compile all the info from the SBC forum into "Nandub Options Explained". Whenever you don't feel satisfied with the explanations provided on this page please refer to the abovementioned page.
First Pass
You have to have Nandub properly set up before you go on, which means that you must have performed steps 5a and 5b of the guide. It's of course possible to perform the first and the second pass at different times. The only thing required for this is that you do not touch neither VOB files, nor the project files (DVD2AVI, TMPG) and AVI files (from VFAPI) that you've created. You should also write down the resizing values from step 5a to be on the safe side. The easiest way to do the 2nd pass at a later time is to save the current profile after having performed the first pass. You can save a profile by pressing Control-S on your keyboard.
During the first step it's useless to process audio so simply select Audio - No audio. Then press F8. You'll be prompted for a filename for the statistics file. Remember that name for the 2nd pass. Alternatively you can press Shift-F8 and after being prompted for a filename for the statistics file you can give the final AVI a name. Pressing Shift-F8 will do the 2 passes after each other so it's imperative that you have already configured the program properly as being shown below.
As said the first pass will encode in DivX low-motion at the maximum bitrate of 6000kbit/s. However, that file won't be saved so you don't have to worry about space just yet.
Second Pass
As it's possible that you will do the 2nd pass not right after the first pass it's imperative that you do not forget to perform steps 5a and 5b before you start the 2nd pass. And of course the 2nd pass will require the exact same filter settings as the first pass or you won't get optimal quality. If you have used additional filters for the first pass you must add them again before performing the second pass. If you've already saved a profile simply load this again (File - Load Processing Settings).
I've found that many people use some pre-made profiles without really understanding and then complaining out loud when the results do not correspond to their expectations. SBC is no "Flask-it" method so you should take your time to thoroughly read the guide and learn to understand what the various settings do. Also resort to the forum for more detailed discussions of these features. Below I'll describe the important SBC features and I give some suggestions about what values might be used. Please note that these values may not be optimal.
Another hint: There's only very few parameters which really have a big influence on the output quality: Bitrate (obviously), BR modulation (should always be on for 1 CD rips), curve compression, gauge min and max and DRFs (don't dare to touch them unless you're aiming for at least 2 CDs and you know exactly what you're doing). I've given suggested values for these parameters in conjunction with the desired output size. These values should give you a pretty good starting point for all kinds of movies. Clearly, every movie requires some optimization for optimal results but simply using these values shouldn't give totally screwed up results. All the other parameters are not really decisive for the end quality.
Press Video to bring up the video submenu.
 This is going to be our playground for the next few minutes at least.
 This
little submenu allows you access to all the important settings for SBC ;)
Do NEVER check Generate stats or No AVI output. Always use just F8 to make the first pass. Checking one or both of these items has lead to a whole bunch of problems for many people.
The first step is to calculate the bitrate so select BitRate Calculator
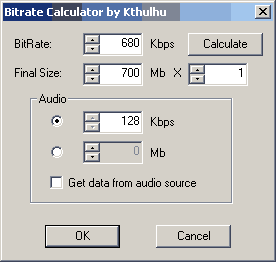 First
enter the CD size and the number of CDs. When you create a CBR audio file you
can now enter the bitrate you're planning to use. If you want to create VBR
audio you must create the mp3 file first, then load it into Nandub (Audio -
(VBR) MP3 Audio), then check Get data from audio source. Finally press the calculate
button and write down the value it gives you.
The next step is setting up all the special SBC settings so select SBC Setting. Then start setting up the DivX codec (DivX tab):
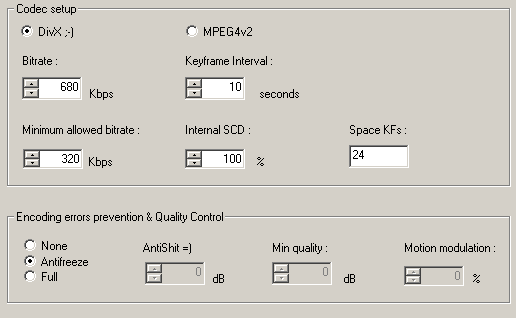 First
of all you can select the codec to use. But as stated in the readme, the only
advantage of MPEG4v2 is that it's legal, so I wouldn't bother with it.
The bitrate should already been set from using the calculator. Unlike in regular DivX encoding this interval has only one function: If after the number of seconds you set there (10 in our example) there has been no keyframe inserted by the scene change detection mechanism a keyframe will be inserted. If there is a keyframe inserted by the SCD (scene change detection) this counter will be reset.
Minimum allowed bitrate is the minimum bitrate the movie will ever use. Values below 300 can lead to very nasty results so be careful with these settings. The minimum allowable bitrate is applied after the bitrate curve has been calculate, scaled, smoothed, etc. In the debugger output you won't see this value but the value before this is being applied.
Internal SCD will help the program insert keyframes when the basic detection misses by analyzing a frame and making it a keyframe if it's composed of more than Internal SCD % keyblocks. Space KFs gives a minimum spacing for 2 consecutive keyframes. Higher values mean less keyframes. A value of 100 disables this feature. Note that the Internal SCD is based on motion levels. If motion exceeds this treshold (motion 300 = 100%) a frame is encoded as keyframe. This can lead to a large amout of keyframes placed very closely together if you have scenes with much motion. Hence many people actually prefer to switch this feature off by setting the value to 100% and use the alternate SCD instead (see later on).
Finally Encoding errors prevention & Quality Control: Nandub offers you 3 different modes here. None does nothing and that's what I use unless my first try gets screwed up badly (freeze frame or really badly looking frames). When you set it to Antifreeze Nandub will prevent freeze-frames (that are frames where the video suddenly freezes and audio goes on). Full finally is the regular quality control mode which has a major impact on the encoding performance. Each compressed frame will get decompressed and compared to the source one. The resulting value will be between 0 and 95dB. If the value is lower than Shit, the frame will be recompressed as keyframe and it will be tested against the original again. A suggested value for Shit is 16 and for Min quality 28-30. When the value is lower than Min. quality Nandub will try to recompress the frame as delta frame but using a lower compression level. You can speed up the process greatly by leaving Min. quality at 0 and just use the shit value. Leaving min quality at 0 also helps when you get oversized files.
The last variable is Motion modulation. The parameter indicates how strongly the anti-shit feature will be applied at a certain motion level. Let's have an example: You entered 16 as Shit and 30 as min quality. At motion level 0 you'd get 16 Shit and 30 min quality. At motion level 150 you'd get Shit = 12 and min quality = 22.5 and at motion 300 you'd get Shit = 8 and min quality = 15. As you can see, the values at motion 300 are the values you entered times motion modulation (16*0.5=8 ;). The parameters are also scaled linearly, so at 1/2 max motion you have 3/4 of the shit and min quality values you entered. Another example: Say you enter 25% modulation. At motion 0 you still get shit 16 and min quality 30. At motion 150 you get shit 14 and min quality 26.25 and at motion 300 you get 12 for shit and 22 for min quality respectively.
And for all the people who didn't get the hint here's a nice little formula (I didn't look in the sources but the values sound reasonable):
Shit = Shit - modulation*Shit*motion/300. Min quality works the same way.
Now let's have a look at Motion:
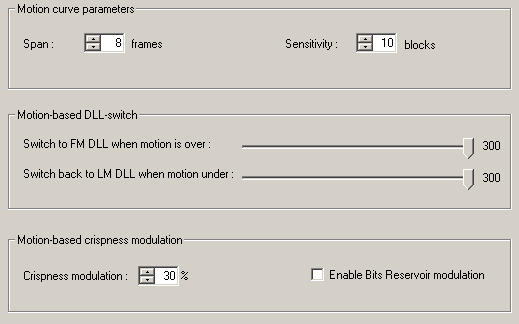 During
the first pass Nandub measures how much motion there is in a certain frame.
The motion is being plotted on a scale from 0-300, where 0 is no motion at all
and 300 the highest amount of motion. Span indicates the area which is being
analyzed to find this measure. ( means from 8 frames before the current frame
till 8 frames after the current frame. If you set this value too high (more
than twice of the suggested value) Nandub might miss a fast peak in motion completely
and furthermore it would also slow down encoding quite a bit.
Sensitivity indicates how sensitive the the motion detection is. Values between 10 and 15 are suggested here. The lower the value the higher the sensitivity.
For those who prefer a bit more info about the concept of a motion event: In a delta frame there are keyblocks and delta blocks. A motion event is a certain amount of a frame being recalculated to keyblocks (note the similar concept with anti shit re-calculating a delta frame and make it a keyframe). Sensitivity in fact means how many blocks have to be recalculated to account for a motion event. If you didn't understand this, don't worry, it's not crucial to work the program, it's just some background info for the interested.
The Fast Motion and Low Motion settings indicate when the codecs will be morphed between low and fast (high) motion. Since the only real difference between DivX Low motion and DivX high motion is different compression settings it's safe to only use Low motion by setting the fast motion slider to 300.
Crispness modulation: Crispness behaves like an unsharp filter in the DivX codec and on the compression levels being used. When motion is equal to 0 crispness will be 100, on the other hand when motion is up to 300 the value you enter under cripsness modulation will be used. In our example crispness will be 100-30 (the value entered by you in the crispness modulation box) = 70. Noisy movies could require a higher value (for instance: Papillon = 50%)
Enable BR modulation will make influence the bitrate reservoir according to the detected motion in the first pass, and not set DRFs directly. BR modulation should be enabled for 1 CD rips in any case. For 2 CD rips you can deactivate it. If you decide to activate motion based curve modulation in the Bitrate Curve tab (this is suggested) then you MUST NOT not enable BR modulation.
Then go to Bitrate Curve.
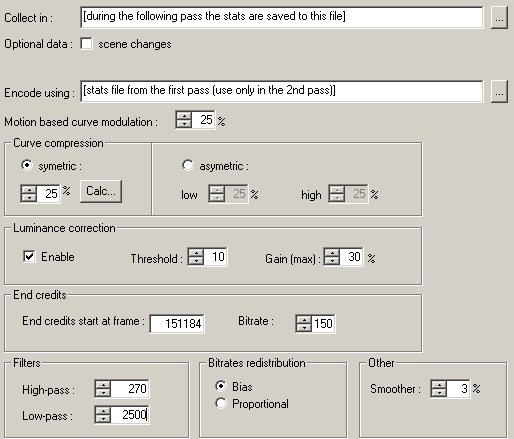 Collect
in gives path and name of the stats file that's being generated during encoding.
Encode using gives path and name of your first pass stats file. You can use
the Collect in line to generate a stats file for the 2nd pass as well for research
purposed. Stats file contain data which allows the program to plot a bitrate
graph. This curve is scaled to correspond to the selected bitrate. If you check
scene changes the scene changes will be written to the stats file as well (in
the first pass of course). This can be helpful to have a more equlibrized distribution
of the keyframes. Here's an example:
Formerly you could have the following keyframes: 0, 10, 20, 21 where 0 and 21 are scene changes and 10 and 20 are keyframes inserted by the codec. If you collect the kf data in the first pass Nandub will equilibrize the kf distribution in the 2nd pass to something like 0, 7, 14, 21. The use of this feature will slow down the first pass a bit. If you never had keyframes that are too close together I suggest you keep it turned off.
Motion based curve modulation: This is basically a replacement for Crispness modulation in the above screen. If you enable this value (set something larger than 0%) you should deactivate the Bitrate reservoir modulation. A suggested value is 25%. It is possible that this modulation gives better results (according to the people who devised it and some who have been using it in the Maras hacks). Basically what it does is modulate the bitrate curve according to motion. Let's say you have motion 300, and modulation 30%. If your bitrate is 600 it subtracts 30% of 600 (180) off the curve resulting in a bitrate of 420. If you have motion level 150 it subtracts 30/2=15% from the bitrate so it's a linear factor.
Curve compression compressed the curve around its average. There are 2 options now: symmetric corresponds to the old way of compressing the curve. Suggested values are 25-30% for 1 CD movies and 10-20% for 2 CD movies.
You can use the Calc... button and it'll fill in the compression value if you've set a reasonable crosspoint (I'll explain later where you set that.. please also check the readme of nandub for more info about the crosspoint).
Asymetric can be used to give less bits to the low motion scenes. Suggested values are 15% for low and 25% for high.
Luma correction corrects luma values (hence the name). During the first pass each frame is measured for "luma noise". Frames with a great deal of contrast will have a high luma noise, frames with little contrast will have a low luma noise so we have to correct or add bits to the low luma noise frames. Frames underneath the threshold get more bits. The further away they are from the threshold, the more bits they get up to threshold over 2, then they start getting less correction. If you have a threshold of 10 and 30% correction then luma noise 9 will get 6%, luma noise 8 12%, luma noise 7 18%, luma noise 6 24%, luma noise 5 30%, luma noise 4 25%, luma noise 3 18%, luma noise 2 12% and luma noise 1 6%. So as you can see it's a proportional triangle which has the gain (max) value at threshold/2 and it decreases proportionally on both sides. Furthermore frames on top of the curve lose bits depending on luma noise. After the frames have been corrected a frame with luma noise 20 loses more than a frame with luma noise 15. Suggested values are 10 for threshold and 30 for gain.
End credits start at frame is exactly what it says: Just locate the frame number where the credits start and enter this in the field and the program will automatically drop the bitrate to the Rate you set in the next field. You can safely go below 300kbit/s here, the credits don't need a lot of bits. I keep them at 150kbit/s but you can safely go lower but I'd stay above 100kbit/s to prevent eventual problems at ultra-low bitrates.
Low-pass and High-pass will set the min/max for the bitrate curve. This prevents the excessive use of bitrate on some scenes which could lead to playback problems on slower computers. High pass 270 has worked just fine for me here. When going for 1CD you might set a low-pass value of about 2500-3000 to prevent the overuse of bits in certain scenes. When you do a 2 CD rip you can safely go higher, like 5000 unless your hardware gives your playback problems at these peak bitrates. The bitrate curve is being used for some sort of "deviation control" so it can actually go lower than the allowed minimum bitrate but the latter setting will effectively still limit the minimum bitrate. Deviation control takes care of keeping the consumed bitrate under control (so you don't get oversized movies).
Bitrates redistribution can happen biased (a constant is added everywhere) or proportional (high bitrate zones get more bits).
Last but not least the smoother value: It sets how the curve is being flattened/quantized. Suggested values are in the range of 2-5%.
Now for the Gauge:
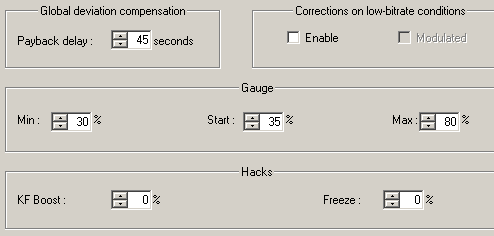 In
the codec, the databit reservoir is defined as 5 seconds of databits (for instance,
if your bitrate is 900kbit/s you have 900x5 = 4500 bits) for key and delta frames.
To measure the bitrate the codec uses a gauge which is adjusted after each frame:
gauge_new = gauge_old + bitsperframe - sizeofframe.
This gauge has a large influence about which compression level the codec will use. If the gauge gets to its min point frames will get less and less bitrate and when it is very low (5% or lower) frames might be dropped since there's not enough bitrate left. The min and max values for the Gauge are there to prevent this from happening, and also stop the overuse of bits. For 1 CD encoding use something like 30 min 80 max and for 2 CDs 40 min 100 max. If the size of your movie gets out of control you have to lower these values a bit (10% steps are suggested). It's now also possible to select a start value for the gauge (in earlier versions it was always 100%).
Payback delay has an influence on the deviation control mechanism described earlier.. it described on how much time the algorithm has to base his decision. As an example 45 seconds still allow to compensate for 10 seconds of heavy action which require a lot of bitrate if the rest can use less bitrate.
Finally corrections on low-bitrate conditions: This is to prevent a side-effect of the minimum allowed bitrate. At very low bitrates the curve gets lower than minimum allowed bitrate. The codec is left at that bitrate and the deviation is updated accordingly but the gauge has the tendency to augment rapidly in these cases which can cause an overuse of bits in the next "normal" scene. If you activate this feature you should activate modulated as well.
You should leave the two "hacks" values alone, in other words leave them at 0. The KF boost adds a small boost to the gauge every time a keyframe is inserted. Freeze forces the codec to believe that the gauge is always at a certain level. This is being used in the first pass (where freeze is set to 100% so that the codec will never run out of bits).
And now for the last tab: Compression levels:
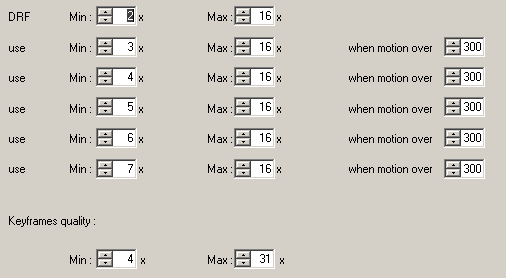 These
settings allow you to set maximum and minimum compression levels, and configure
even further if you like. Normally DivX uses compression levels 2-16 but here
you can change that. If you simply want to set a maximum compression level all
you need is the first line and make sure that all the other lines have 300 in
the "when motion over" box. Or you can configure it to use certain
minimum and maximum levels when the motion setting goes beyond a certain boundary.
Here's the big news compared to the earlier guides: The only thing you have to set is the first line, set a minimum and maximum compression level. 2-8 is a suggested value for 1CD movies, for 2 CDs you can go lower than that, like 2-6 or even 2-5. If your movie is oversized in the end it's either here or in the bitrate reservoir where you have to make some changes (use less aggressive settings... that is use a higher max DRF, and lower min/max values for the gauge).
Last but not least Nandub offers (again) the ability to influence the quality of the keyframes by setting a DRF for keyframes. This works together in conjunction with the Min and Max DRF (the first line). If max DRF is lower than keyframes quality the keyframe will be encoded at Max DRF. If Max DRF is higher than keyframe quality the keyframe will be encoded at keyframe quality DRF or a higher DRF (not higher than Max DRF though). Please also refer to the readme.doc for this features, especially when you think it creates problems. 4x the the default value of the Divx codec. Keyframe max quality will give a max compression settings for keyframes. It will only work if you have collected the scene changes in the first pass and it will only be taken into consideration if the value is lower than the actual MAX DRF value. Quality control mechanisms (AntiFreeze/AntiShit) won't respect that value and the use of this feature might lead to dropped frames when improperly used so follow Nando's advice and let this value at 31x.
It's suggested you do not use the other DRF switches anymore unless you really know what you're doing (97% of the people do not). Let me just give you a small example how things work out. Say a frame has a motion value of 200. Nandub now checks this value against the table shown in the screenshot. Since all values of "when motion over" are 300 the first line is used. Now let's assume you had set a line like this: use Min: 3x, max: 5x when motion over 195. Since your frame has motion over 195 the settings of this line would be applied. The checking always starts at the first line so when you use the DRF constraints start with low DRF levels at low motion settings and high DRF levels for much motion. Why compress more when there's a lot of motion? Because the human eye is not able to make out small details when there's a lot of motion, so we can compress these frames more without the eye noticing that the frames by themselves are pretty ugly. As a Nandub pro you might want to use these values when making a 2 CD rip. To prevent long trial&error sessions you should run Dbgview while making the 2nd pass. Then you can analyze the encoded movie and find out the motion values for ugly parts and you know which line you have to change. If you don't understand this.. don't worry.. in this case you simply shouldn't use it. You can make good rips without messing around with the DRF settings.
A word about how the codec works: First it performs motion compensation, then it creates a bitmap which has 32 additional pixels to each side, to which it then applies the crispness settings, then the frame will be encoded at 1x compression level, then it looks at the gauge and makes a decision on a compression level. Then the settings of this box come into effect, which will give you complete control over the whole encoding process. Only time will allow to find the perfect settings, if they even exist. You're encouraged to test your own settings ;) You should not limit the choice of compression levels to strongly, otherwise you'll run into problems with the final size.
Another note: The main difference between DivX Low motion and DivX Fast motion is the hardcoded compression settings. Fast Motion basically has a hardcoded DRF minimum of 7 and goes up till 16 whereas Low motion can go up till 2. Fast motion might be a bit better at motion detection but the difference is hardly notable. So in fact you can safely set the Fast Motion slider to 300 and only work with the DRF settings. Or for instance you could use DRF 7-16 for motion over 280 which achieves the same as having the motion switch (from Low Motion to Fast Motion) at 280 in the motion detection box.
FlaskMpeg note: If you used FlaskMpeg to frameserve you should also compress the audio. Do that by selecting Audio - AVI audio, then Audio - Compression which allows you to configure the audio codec.
The last step before encoding is setting up the internal VirtualDub Scene Change Detection (for VKI): Press Options - Preferences and select the Scene tab:
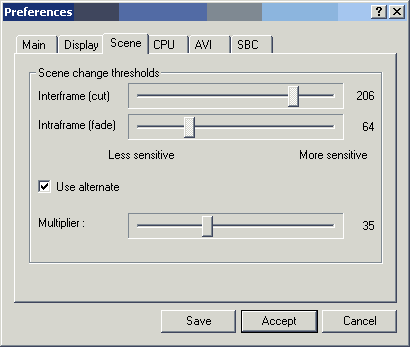 You
can play around with these settings if you like but the default ones work fine
in most cases (and after all we've set up Nandub to insert a keyframe if the
internal detection fails).
Use stronger Interframe cut for very dark movies.
Or you can use Nandub's alternative setting which works even better imho. This is the alternative I mentioned in the DivX setup settings. This SCD is actually based on luma levels rather than motion. It works as follows: if curr_diff > last_diff the frame becomes a keyframe. curr_diff = absolute difference between the current and the last frame in terms of pixels in the luma space. last_diff is then set to last_diff = curr_dif * multiplier / 10, and if last_diff is below 10'000 after this it's set to 10'000.
Last but not least go to the SBC tab:
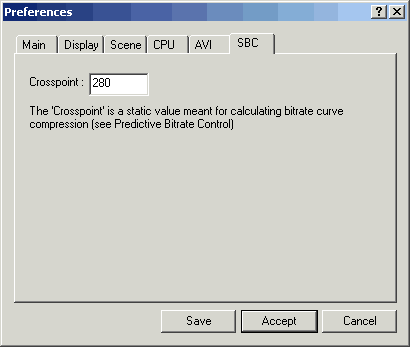 Here
you can set the crosspoint which is used for the Calc... button mentioned before.
If you think the calculated value for the compression is too high just lower
the crosspoint.
The crosspoint value is used in the calculation (calc-button) at the curve-compression. Until now there is no final rule how this should be set, but using a crosspoint of 230-280 for 1 CD rips and 350-460 for 2 CD rips is been tested to work well.
See the Nandub documentation (readme.doc) for how the crosspoint works.
Press Save and Nandub will save your settings for good.
Once you've set it all up it's time to start the 2nd pass by pressing F7. Don't forget to verify that are your filters are still properly configured before you start! Hope you didn't get too confused with all these settings.
During the encoding you might want to take a look at the statistics window:
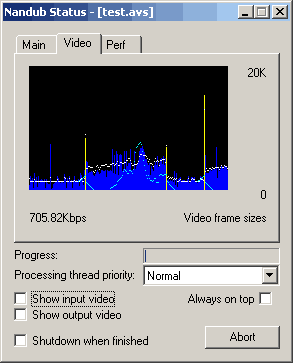 Even though preview is nice I'd suggest you disable Show input video and Show output video. The height of the bars you see represent the size of each frame. Blue bars are low-motion frames, green frames high motion frames (using the default - and suggested - setup you don't get any of these). Red bars are keyframes inserted by the internal SCD (which you can disable by setting it to 100%), yellow bars keyframes inserted by the alternative SCD. The white curve is the stats curve (targeted average bitrate) and the cyan curve is the motion curve. As you can see below the graph the current bitrate of the video is also being displayed. When you see the white curve go flat that means that the min bitrate limit has kicked in to limit the bitrate from dropping further.
Also, disable the previews since the preview lags behind the stats curves and you might get confused.
If you prefer to work besides encoding you can lower the processing thread priority. Setting this to idle and Nandub will only use whatever CPU time is left after all the other apps have had their share.
Last but not least Nandub has a safety feature. If you close the application all your current settings are saved in the __last__.vcd profile in the Nandub directory. This might come in handy if you accidentally close down Nandub or if you forgot to save your profile.
>> BACK
This document was last updated on 08/17/02