Robot4Rip guide
As you may know, Gordian Knot development has been slow for quite a while.
This is due to two issues: The developer is lacking time, and in his spare time
he was working on the successor of GordianKnot which was supposed to dominate
the DivX and XviD creation business. Unfortunately, time go so scarce that there
was a risk that this infamous GKnot successor would never be released. Now TheWef
presents you Robot4Rip, which is essentially the working part of the GKnot successor
he was working on. Robot4Rip or r4r for short will help you rip your DVDs, encode
audio, extract subtitles and create a DGindex project. Everything is automated
and fully configurable and should help you make your life easier.
In order for r4r to find almost all required applications you should first
install Gordian Knot including the System Pack. r4r will use the same access
paths by default so your configuration effort will be minimized.
Step 0: First time setup
The first time you start r4r you should invest some time properly configuring
it. You'll only have to perform this step once (unless you reinstall your
operating system) and it will ensure that the next time you start r4r everything
is already pre-configured for you and all you have to do is enter a DVD and
press the start button.
Step 1: Processing
Note: This guide assumes that you are using r4r to rip the DVD as well. It's
possible to work with pre-ripped files though.
Once all preferences have been set things become much easier. The main screen
has 5 areas: PGC, Audio streams, Subtitle streams, Workflow and Project options.
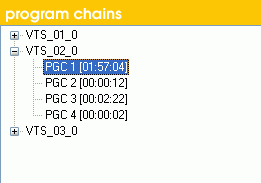
Let's start with PGCs:
 r4r
will scan your DVD drives upon starting up, and if a DVD is found the content
will be listed. By default the main movie is already checked so you won't have
to do anything special here. If you'd like to process another PGC just select
it from the list.
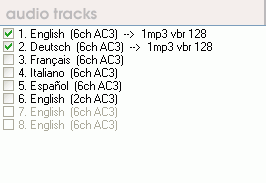
Then we have the audio tracks:
 According
to your audio preferences audio tracks will be preselected. As you can see,
both English and German audio are already selected, and you can also see what
these tracks will be encoded to: 128kbit VBR MP3.
Audio tracks that are grayed out are not present in the currently selected
PGC (but are present in another PGC in the same VTS set).
You can freely check and uncheck audio tracks here and if you prefer to use
another compression profile right click onto the desired audio track and select
another of the predefined profiles: (remember, you can always add or change
profiles in the audio preferences).

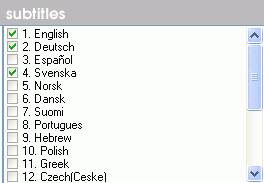
Subtitle selection is essentially the same:
 In
compliance with my previous settings 3 preferred subtitle tracks have been selected.
Of course you can always select other subtitle tracks by just checking the appropriate
checkbox.
As with audio tracks, grayed out subtitle tracks are not present in the currently
selected PGC.
Then we have the project options:

By default the project title corresponds to the name of the DVD disc but you're
of course free to change that. You can also still change the disk drive to store
the data for the various items without having to go to the preferences again.
Once everything has been set properly the workflow comes into play:

It will show you what is being done with the project. As can be seen above,
the DVD is first ripped to an ISO Image, then the selected PGC is ripped and
the selected audio tracks will be demultiplexed, a DGIndex project is created
from the selected PGC, then the selected audio streams will be encoded, the
selected subtitle streams will be extracted and chapter positions will be recorded.
To get started just press the Start (shaped like a play button on your stereo)
button. And if you want to disable one of the steps, all you need is left click
on the corresponding symbol. Or, if you want to reconfigure that step, right
click on the corresponding symbol to bring up the associated preference page.
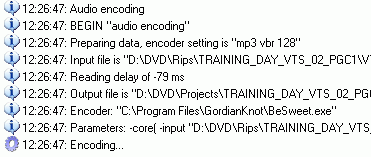
While processing r4r will show you a log window. Make sure you don't close
it and when something goes wrong save the log, it can help other people identify
your problems.

Last but not least, you can queue multiple projects. Once you have started
processing just set up another project and press Start again. Then if you go
to the Queue Manager (press Control-Q or select Window - Show Queue Manager)
you can see which project is currently being processed and which ones are waiting
to be processed. The queue manager also allows you to cancel projects you have
queued.
Step 3: Postprocessing for NTSC users
If your source is NTSC, you'll have to perform this step as well: open the
.d2v file that r4r created in a text editor (Notepad will do just fine).
At the bottom of the document you will find a line similar to this:
FINISHED 99.93% FILM
If it doesn't say FILM, you're done. If it does say FILM, and the percentage
before it is larger or equal to 95.00%, then locate the following line at the
beginning of the file:
Field_Operation=0
and change the 0 to a 1 to enable force film. That will spare you a slow IVTC
process. Once you're done, save the file and close the text editor.
This document was last updated on
August 10, 2005
 r4r
will scan your DVD drives upon starting up, and if a DVD is found the content
will be listed. By default the main movie is already checked so you won't have
to do anything special here. If you'd like to process another PGC just select
it from the list.
 According
to your audio preferences audio tracks will be preselected. As you can see,
both English and German audio are already selected, and you can also see what
these tracks will be encoded to: 128kbit VBR MP3.

 In
compliance with my previous settings 3 preferred subtitle tracks have been selected.
Of course you can always select other subtitle tracks by just checking the appropriate
checkbox.


