Subrip Guide
Step 1: Extract the subtitles
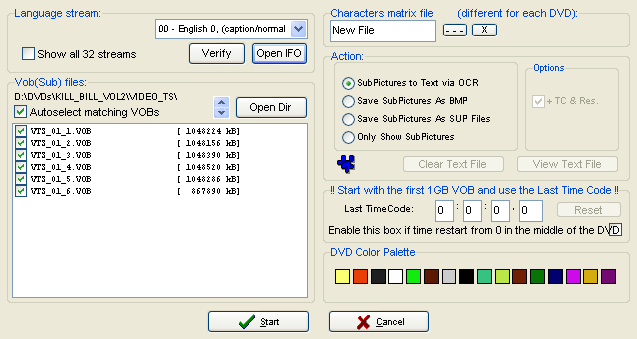
Start up SubRip, then select File - Open Vob(s).
 Press
Open IFO and select the IFO file that belongs to your ripped VOB files.
Should you not have an IFO file (it's a bad start), you can also simply open
the first of a series of VOB files by pressing Open Dir and select a
VOB file. The option Autoselect matching VOBs will take care that all
the VOB files you need will be selected.
Then select the language you want to extract from the dropdown list in the
Language stream area.
Subrip allows the use of so-called characters matrix file. These files can
be used to save the results of the character recognition, thus in the future
you may not have to enter so many characters manually but Subrip will be able
to automatically decypher them. If you already have such a file, you can load
it here by pressing the --- button.
Make sure SubPictures to Text via OCR is selected in the Action area.
This enables the image to text conversion.
Also make sure that the Last TimeCode is set to 0:0:0.0 (this may not
be the case if you've previously ripped a subtitle stream and have not closed
Subrip).
Then press Start to get started.
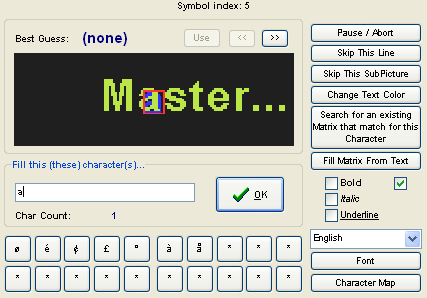
Sooner or later, SubRip will detect the first subtitle, and pop up the following
window:
 Since
we're using OCR to get our subtitles the program has to "learn" which
Image represents which character. Answer everyone of these question boxes very
carefully, it will make your life much easier in the end.
Most of the buttons are self-explanatory, but some might come in useful: Change
Text Color allows you to change the color of the subtitles, which may or may
not help with the recognition.
You can also search for an existing character matrix that would match the character
currently on screen. As you can see, Subrip also offers to mark a character
as being bold, italic or underlined.
Furthermore, there are 20 buttons that you can configure with your favorite
characters so you won't have to look them up in a character map (which incidentally
you can display by pressing the Character Map button)
After a while the program will pretty much on its own since it know all characters.
Some time it will recognize two characters as a simple one, then simply enter
the two characters in the red box. Also use your imagination when stuff like
%'s or " 's are not correctly recognized.
While Subrip is running, it'll show you how the subtitle file will look in the
end

Once processing is complete, click File - Save in the window
shown above this text to save the subtitle file.
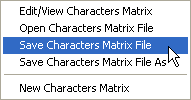
Then you can also save the character matrix file, by selecting Characters
Matrix - Save Characters Matrix File from the main menu.
Step 2: Converting to another format (optional)
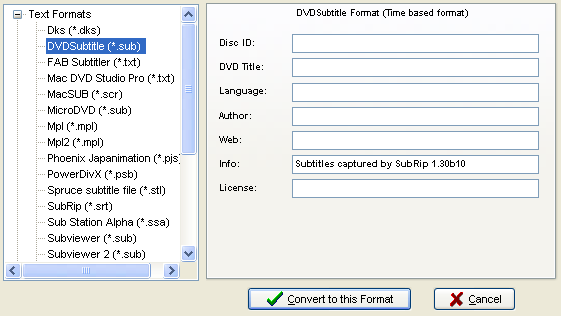
If you need another output format for some reason, you can change the format
even after ripping via Output Format - Set Output Format.
Step 3: Splitting
First of all you need to know at which point you're going to split the file.
Thus, split your video first, then you know at which point you have to split
the subtitles. Then open the subtitle file again in Subrip and press the button
that looks like a CD, or select the split function from the menu (Output
Format - Split Output File)
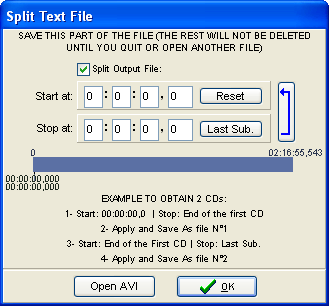 Check
Split Output File, then press Open AVI to load the first part
of your movie. This will automatically fill out the Stop at timecode.
Then press OK to save all subtitles that belong to your first video file.
Then press the button to the button that has a long blue dart on it. This will
transfer the end timecode as start timecode. Then press the Last Sub.
button so that the Stop at time will be properly filled in. Press OK
again to save the second subtitle file.
Step 4: Playback
Most media players these days can handle external subtitle files if the files
are named like the movie file. If your media player cannot handle subtitle files
natively, install the VobSub filter and the next time you open a movie, your
subtitles should be loaded automatically.
This document was last updated on
August 10, 2005
 Press
Open IFO and select the IFO file that belongs to your ripped VOB files.
Should you not have an IFO file (it's a bad start), you can also simply open
the first of a series of VOB files by pressing Open Dir and select a
VOB file. The option Autoselect matching VOBs will take care that all
the VOB files you need will be selected.
 Since
we're using OCR to get our subtitles the program has to "learn" which
Image represents which character. Answer everyone of these question boxes very
carefully, it will make your life much easier in the end.


 Check
Split Output File, then press Open AVI to load the first part
of your movie. This will automatically fill out the Stop at timecode.
Then press OK to save all subtitles that belong to your first video file.
Then press the button to the button that has a long blue dart on it. This will
transfer the end timecode as start timecode. Then press the Last Sub.
button so that the Stop at time will be properly filled in. Press OK
again to save the second subtitle file.