VirtualDub procedures
Table of content
Audio resampling for SVCD
Audio encoding
Delaying an audio track - solving video before audio
and audio before video issues
Extracting AC3 audio from an AVI
Extracting MP3 audio from an AVI
Frameserving from VirtualDub
IVTC
Joining uncompressed audio and compressed video
(including MP3 audio compression)
Merging AVI files
Merging AVI files (advanced)
Manual synching - resolving audio and video synchronisation
issues
Multiplexing AVI and MP3
Rederive keyframes - solve slow seeking
issues
Resizing for SVCD - how to resize any input for later
SVCD encoding
Splitting AVIs into multiple parts
Installing Frameserver support
Go to your VirtualDub directory and run a file named AUXSETUP.EXE, in the menu that'll open, click Install Handler.

After installing the handler, double-click on "PROXYON.REG" which can be found in the AVIPROXY subdirectory in the VirtualDub directory. Note that you MUST uninstall the frameserver by running PROXYOFF.REG after you finish encoding.
Starting the Frameserver
Then, assuming that you haven't already loaded an AVI file, load your video file (Control - o), and set Video to Full Processing Mode:
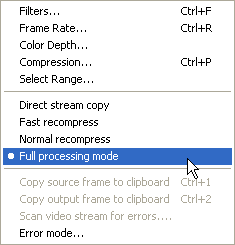
Then click on File - Start Frame Server, and click OK on the pop-up window. You will be prompted then to enter a filename. Select a filename and give it the extension .AVI, e.g. test.avi. Once done, the following window should appear, and you're done.
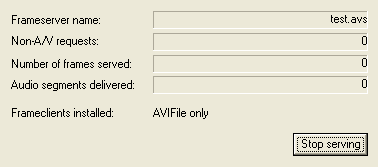
And here comes the important part: You leave VirtualDub/Nandub running until you have finished encoding. As soon as you press the Stop serving button the frameserver stops and your encoding program can't continue (or even start).
This concludes the frameserving part and you can press on the back link. Do not close VirtualDub or press the Stop serving button before you've concluded your encoding session.
>> BACK
If you already have a compressed audio file please proceed to the special instructions for that case.
Otherwise, open your video by selecting File - Open video file... from the main menu:
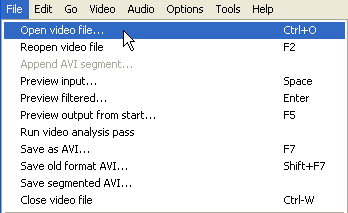
Then load your WAV file via the WAV Audio... option from the Audio menu and make sure you set Audio to Full processing mode immediately afterwards.
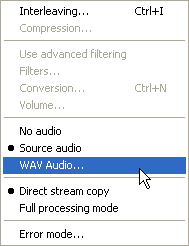
This will enable the Compression... menu (still grayed out in the screenshot above), which you then have to select.
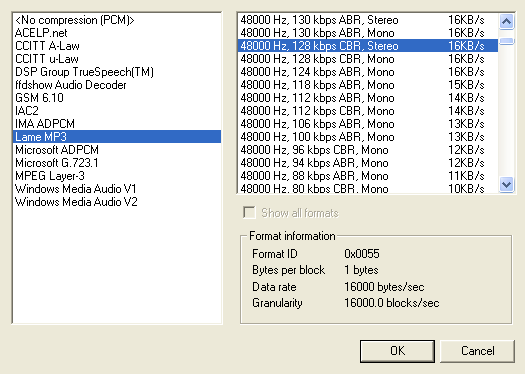 If
you have installed the Lame ACM, select Lame MP3 and then your desired
bitrate. Keep in mind that VirtualDub can only handle CBR audio, so you must
select a CBR option.
Alternatively, you'll find MP3 audio codec options under MPEG Layer-3.
Press OK to close the configuration screen.
Then launch the process by pressing F7 and selecting a name for the output.
When you're experiencing asynch movies here's what you can do. You may want to take a look at the alternative method, which should be a bit easier but needs additional programs.
Step 1: Selecting the rangeFirst of all select Video - Frame Range. The following window will appear
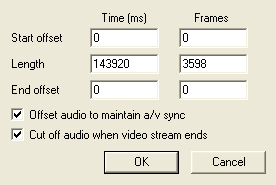 Here
you can select the length of your movie. So for instance if you need to find
the correct Source displacement (read below) you can select the length to a
couple 1000 frames instead of encoding the whole movie and then find out that
your settings were wrong. Also make sure you select a fast audio compression
codec (DivX audio or uncompressed PCM since mp3 will take too long for testing).
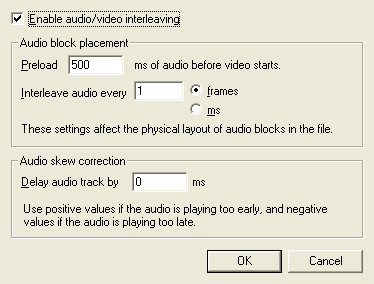 Let's
talk a bit about Interleaving: Press CTRL-I to see this dialog. If the video
was asynch from the very beginning (otherwise go directly to step 3)you need
to find the correct Source displacement. If the video is before avi (say you
see James Bond move his lips but you hear "My name is Bond, James Bond"
later) that means that you have to move the audio to the "left" -
or apply a negative Source displacement. If the audio is before video you need
a positive value. This is a real trial and error operation - I can't give you
any specific hints. Just one thing: Sometime setting Interleave audio every
500ms instead of every frame helps. If you think you found the right value go
to step 3.
Before I forget: It's possible that adding source displacement already gets rid of your synch problems. In that case there's no need to follow these instructions any further.
Press CTRL - R to display Framerate options.
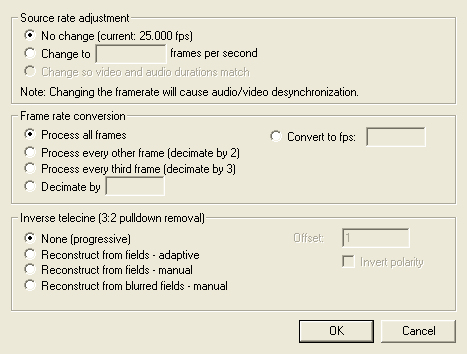 In
Video frame rate control you can change the speed of your video (audio speed
is unchanged). Since your movie is gradually getting asynch (you followed step
1 and 2 I hope) we need to speed up/down the video so that it matches the audio
speed. If the video is faster than the audio (a scene is happening on screen
before you hear the corresponding sound) you have to decrease the framerate
by manually setting a lower framerate (or increase the framerate if the audio
is faster than video). Now this is a dangerous operation and I suggest you change
the framerate only in very small steps (like 0.002 or so fps). Once again using
a fast audio codec is greatly helping since MP3 compression takes a long time.
If you can't get the movie synch changing the framerate you're screwed. But
till now I've always been able to synch a movie using only source displacement
and I don't believe there's any unsynchable movies.
Alternative way - this program can be got in the download section.
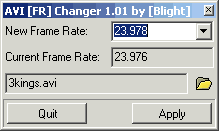 Select
your avi by clicking on the folder icon. Then enter the desired framerate in
the uppermost text field, or select a framerate from the dropdown list. Then
press apply.
This method was suggested by JD_80 in the FlaskMpeg group in Delphi.
First of all you need to get this little program, and a wave editor. Many times such an editor is already included in the software that came with your soundcard, if not I suggest you get CoolEdit or a similar software. Since there's lots of different tools to do this operation I can't supply any pictures on wave editors since it would only help a small percentage of you.
Then you will need to find to spots in the video where you can 'see' audio. Using VirtualDub find points such as doors shutting, scene changes that don't fade, or any other sudden audio changes. One spot should be as close to the beginning as possible and the other should be as close to the end as possible. Note the times in the video of these spots. We'll call these V1 and V2.
 Use
buttons 1 to go forward/backward frame by frame in VirtualDub, and buttons 2
to move around by keyframes. You can see the exact position in the movie in
the left corner at the bottom. The numbers in brackets represent the current
position in the movie, for instance 0:02:21.236 means 0 hours, 2 minutes, 21
seconds and 236 milliseconds. Make sure that you got the positions right, the
more exact they are, the more exact will the synch be in the end.
Now start up a wave editor, load the wav file and find the corresponding spots. These will be called A1 and A2. Also note the total audio length, called Ae. Finally go back to VirtualDub and seek to the end of the video. Note the time here, let's call it Ve (for end).
ALL OF THESE NUMBERS SHOULD BE CONVERTED TO SECONDS!
ex. 15042.847
Once you have all these numbers, start up a command prompt, launch Synch.exe and enter the values you've calculated above separated by a space. Add as much silence to your wav as the tool tells you or cut the audio when told to do so. Use your wave editor to get this done.
Finally, after the audio is saved, follow the instructions for VirtualDub with one exception: After everything has been set up, press Control-R and select "Change so video and audio durations match".
Even though this may sound complicated, once you do it once it is really easy and always perfect synch (unless you make imprecise measurements on the audio or video).
>> BACK
First let's have a look at how splitting works in Nandub. Then we're doing the same in VirtualDub where it is more complicated.
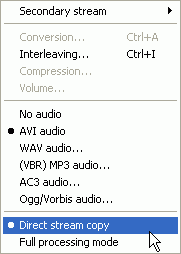
Start up Nandub, press Control-O to load your AVI. Set Video to Direct stream copy:
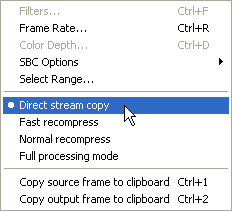
Then press the Home button on your keyboard, followed by Control-Shift-J (or Edit - Go to last keyframe if you prefer to work with your mouse):
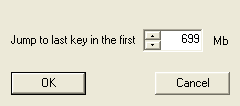 Here
enter the CD size minus about 2 MB. As you can only cut by keyframes it is likely
that if you enter the exact size of the CD the next keyframe will be a few MB
after that limit and the file will be too large.
Then press OK and you'll see that Nandub will have moved forward to the cutting
point. Now press the End button on your keyboard, then press F7 to save the
first part.
After saving press the home button, move the slider at the bottom of Nandub
to the right, press End and F7 to save the second part.
That's it :) Time to watch your movie.
>> BACK
If you prefer to operate with sliders go here..
Load your movie VirtualDub. Select Video, then Select Range:
 There's
no way to make sure how large the resulting file will get so you basically have
to guess. If your whole movie is 1300MB cut at about half of the total length
(divide the length by 2, then enter that value in the Length field... I prefer
to operate by frames but you can of course use Time if you prefer). You can
select a length by offset (an start offset of 1000 would mean the video would
start at frame 1000, an end offset of 2000 means that your video will end at
frame 2000) or by length in number of frames/milliseconds. The latter is obviously
easier to use, but it will only work for the first part. So select Start offset
0, Length as desired, then press ok and save the movie. Verify that the size
is what you wanted, if not go back and select another length. For the 2nd part
of your movie, copy the End offset that's currently being indicated in the corresponding
text field to the start offset text field, set a length again (if you're splitting
to 3 or more parts) or set End offset 0 (meaning the file will include everything
from Start offset till the end. Make also sure that you split by a keyframe,
not just any frame - otherwise you might lose some frames and it'll be impossible
the remerge the files if needed.
Attention: Make sure that you've set both Video and Audio to Direct stream copy. Generally when you start VirtualDub Audio is already set to Direct stream copy but Video is not. If you don't change this it takes hours and it'll decompress and recompress the whole movie - not a smart thing to do.
The following slider can be used to go from one position to another quickly. The buttons marked (1) can be used to go forward/backward frame by frame, the buttons marked (2) can be used to go forward/backward by keyframe.
Alternatively you can use the navigation controls to select the range directly. During these operations it's important that whenever you move the slider you press down the Shift button on your keyboard which will make sure that your positions are at a keyframe. Move the slider to the desired starting position, then press the Home button on your keyboard. Then move the slider to the desired end position and press the End button on your keyboard. Then save the movie (F7). Now press Home again which will make the current position the start position and move your slider again (while pressing down Shift, of course). Repeat the process until you have splitted the AVI into however parts you may want.
>> BACK
The easiest case is if the 2 files do not overlap. In this case we can basically append the 2nd file to the first one and we're done. Depending on how the movie was cut we may have 1 frame twice but that's hardly noticeable. If you have overlapping files follow these instructions. Your best tool for the task is Nandub as it can handle even VBR MP3 and AC3 audio. So start up Nandub, and load the first AVI file by pressing Control-O, then selecting the first AVI file.
Then select File - Append video segment or simply press the + button on your keypad to select the second AVI file.
Now set both Video and Audio to Direct stream copy:

Now press F7, select a name for the new file (make sure it's different from the 2 original files), then press OK to save. After a short while you'll have your whole movie in one file.
Joining two DivX filesI must admit that I got the initial idea about this from Nick Page's guide over at the DivX Digest. But since he "stole" the low-mo high-mo combo from me I think that should be okay.
So let's assume that you have 2 DivX files, called movie1.avi and movie2.avi. Load the first one in Nandub. Then set both Video and Audio to Direct stream copy. After that press Video - Select Range:
 Now
enter a small value in the End offset field - in the Frames section.
Then save the file under another name, say movie1-2.avi. Then load the avi you've
just created in Nandub. Then append the second file to the first one by selecting
File - Append video segment from the menu or pressing the + button
on your keypad. Then save the AVI and play it. Hopefully everything plays fine.
Now we're going to make an even more dangerous stunt: Let's assume that you've
done a movie in DivX but at some point you had to abort or whatever. Then later
on you started again but at the position you quit. Of course you have to chose
a position before the position where you ended the first run, otherwise you'll
miss a part of the movie. So let's assume that you've done all necessary preparations
and you're ready to go. You have two avi files, one called movie1.avi and one
movie2.avi.
Load avi1.avi into Nandub. Start a second copy of Nandub and load movie2.avi into it. Now you have to find out a suitable position where the transition will take place. I've found out that if you append the 2nd file starting with a keyframe you're all set. So what you have to do now is to watch the end of movie1.avi closely. Use VirtualDub's control buttons to advance frame by frame (1) or keyframe by keyframe (2).

Now here's the tricky part: Go to movie2.avi, look at the very first keyframe and try to find the exact same frame in movie1.avi. Or if it's too hard to find try to find the position of the 2nd, 3rd or whatever keyframe of movie2.avi in movie1.avi. I've found that people who use subs have a real advantage here... When you're sure that you've found the right position select Video - Select Range in movie1.avi, enter 0 as start offset and the position of the frame you've been looking for in the last 30 minutes <g> in the Length field (once again I'm talking Frames here, not Time). Then save the avi under a different name, say movie1-2.avi . Then, provided you've not selected the first keyframe in movie2.avi, save the 2nd avi, but before saving set Range to process as follows: Start offset: the selected Keyframe and End offset 0. After that load movie1-2.avi into VirtualDub, then select File - Append video segment as shown in the picture above and append the modified version of movie2.avi or movie2.avi if you haven't changed it. That should get you a perfect avi, not a single frame dropped and completely synch and all - provided the avis were synch of course...
>> BACK
Redo Keyframe settingsOpen the Avi File in VirtualDub, but check the Popup extended open options at the bottom of the window.
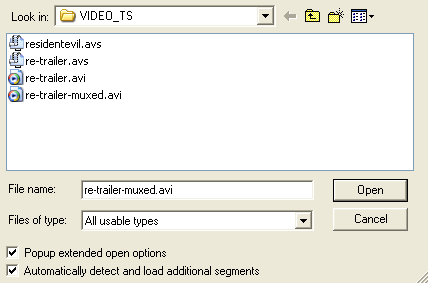
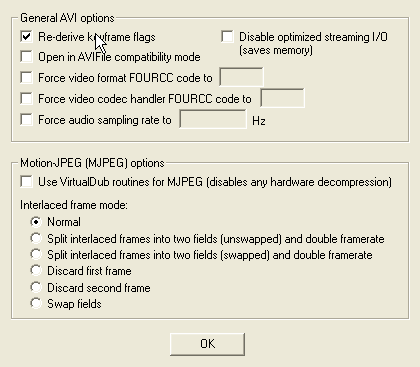 Then
check the Re-derive keyframe flags as shown on the left. I don't really
know if this works, I've been told it would but since I never had any problems
I never had to use this option.
>> BACK
 Delay
audio track by XY ms is what you're looking for...
>> BACK
Load your AVI or avs. Press Control-R
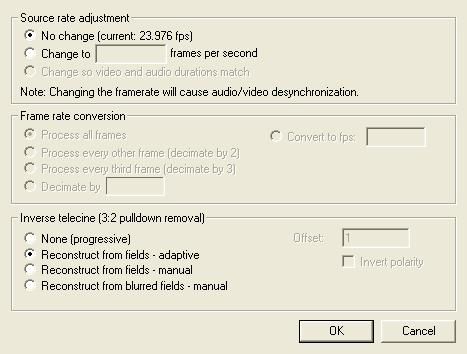 Enable
Inverse telecine by selecting Reconstruct from fields - adaptive. You
can also try the other options but most the adaptive algorithm is the most likely
to succeed.
>> BACK
Load the VFAPI AVI into Virtualdub. Then press Control-F, select the Resize filter and configure it:
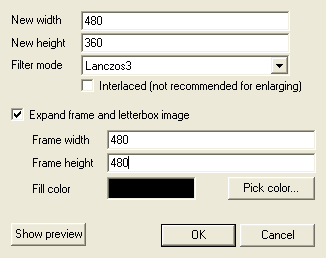 Here are the settings you have to use:
NTSC: 480x360, check Expand frame and letterbox image, set the Frame width to 480 and the Frame height to 480.
PAL: 480x432, check Expand frame and letterbox image, set the Frame width to 480 and the Frame height to 576.
Note that these values are only for 16:9 movies (anamorphic widescreen), in case of 4:3 movies you simply resize to the right height and you won't have to worry about letterboxing.
Set Filter Mode to Lanczos3 for the best results. Then press
OK and close the Filter window.
You may also want to load your WAV track into VirtualDub (Audio - WAV audio) but set Audio to Direct stream copy (default value) for better speed. Video has to be set to Full processing mode.
>> BACK
Nandub makes this process much easier and can handle any kind of MP3 file, not only CBR so it's the suggested program for this, not Virtualdub.
Start up Nandub and load your video (Control-O). Then set video to direct stream copy (Video - Direct Stream Copy).

Now you have to load the MP3 file. To so so simply select (VBR) MP3 audio from the audio menu which brings up a selection window where you can select the MP3 file.
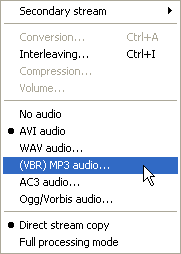
If you have written down an audio delay in the process select the Interleaving option from the above menu:
 Enter
the delay value from your AC3 file in the Delay audio track by XY ms field.
Negative values get a minus in front of course. Then press OK. There's no need
to change the other values.
Make sure audio is also set to Direct Stream Copy, then press F7 and save the
AVI under another name then the file you loaded at the beginning. If the audio
is asynch after joining read how to make it synch.
>> BACK
Press Audio - WAV audio and select your WAV file.
If it's 48KHz you'll have to downsample it to 44.1KHz which is the sampling rate the SVCD specs require. Press Control-A to bring up the audio conversion dialog.
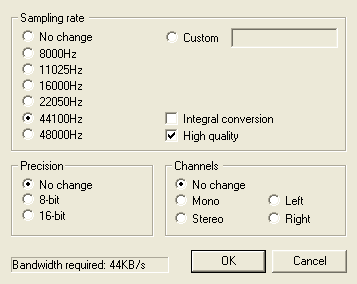 Select
44100Hz sampling rate and check High quality. Then press OK
to get back to the main window.
>> BACK
Start up VirtualDub and press Control - O to load your video file. Then make sure video is set to direct stream copy (Video - Direct Stream Copy). Then load your audio file (Audio - Wav Audio...) and verify that it's also set to direct stream copy. Then press F7 to save the avi. Under no circumstances try to overwrite the old AVI..
>> BACK
Start up Nandub, press Control-O to load the AVI file, then set audio to direct stream copy.

Now select File - Save WAV.
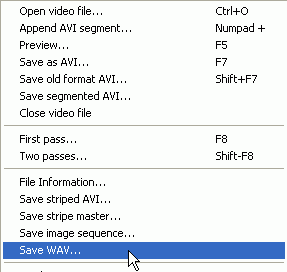 Select
a name, then press OK to start the extraction.
Now we're not quite done yet. The AC3 file we've just extracted contains a WAV
header so any AC3 processing application would complain that the file is invalid.
In order to fix that you have to run BeSliced, drag&drop the file onto the
small BeSliced window and select Fix File! from the menu that will show up.
![]()
BeSliced will create a new AC3 file called audio_Fixed01.ac3 (if the original file is called audio.ac3) and that's the file all programs should be able to process.
Start up VirtualDub, press Control-O to load the AVI file, then set audio to full processing mode.
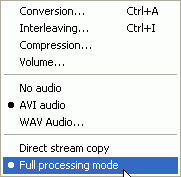
Now select File - Save WAV.
 Select
a name, then press OK to start the extraction.
You'll get a pretty large WAV file. As we set audio to full processing mode
we have effectively decompressed the MP3 and turned it into an uncompressed
WAV file. This is a safety precaution as many programs who support MP3 input
are a little problematic with that kind of input whereas WAV input is never
a problem.
Start up VirtualDub, press Control-O to load the AVI file, then set Audio to Full Processing Mode:

Set Video to Direct Stream Copy, then select Compression...
 Select
MPEG Layer-3 at a bitrate of 128kbit/s (more doesn't make much sense, and for
the low quality video doing a VBR MP3 track would be overkill, too).
If you don't have the MPEG Layer-3 codec install the DivX3 codec or the Radium codec (both available from my page).
After the selection press OK and press F7 to save the AVI (this will start audio encoding).
This document was last updated on August 13, 2005