 Press the
folder button to select the path where your DVD files reside.
Press the
folder button to select the path where your DVD files reside.Burning DVDs
DVDs, much like CDs, can be burned using different means. Your DVD authoring, DVD transcoding, etc. Tool will normally give you a VIDEO_TS folder containing a number of .IFO, .BUP and .VOB files. Most commercial burning programs can directly burn such folders.
I have prepared guides for the burning programs that I currently own: Nero and DVD Decrypter.
Alternatively you can create a disc image file first and burn this using any software capable of burning disc images. Initially this was the better solution as some commercial programs (especially Nero) had problems burning a VIDEO_TS folder. The discs created this way would often not work on a standalone. But if the same program was used to burn a disc image, there was no problem whatsoever. Fortunately, this has changed since but the tools to create an image are still interesting because they do not require any commercial software. Below you'll find instructions how to use ImgTool classic to create a disc image and burn this using DVD Decrypter. Note that the v1.x ImgTool is using the Nero engine, thus requiring you to have a commercial burning tool installed, and if Nero were to fail so would the new ImgTool. ImgTool classic on the other hand is based on the freely available mkisofs image generation tool.
In order to create a DVD image start up ImgTool.
 Press the
folder button to select the path where your DVD files reside.
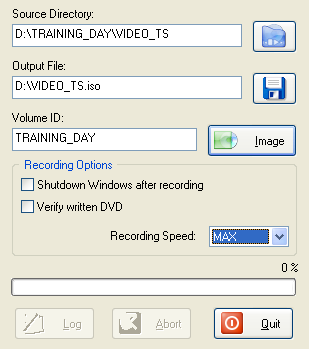
Then press the disk button to select a filename for the image you're going to create, then set a name for the disc and last but not least press the Image button to get started.
The Recording Options should be straightforward: Shutdown Windows after recording does just that, and Verify written DVD will make DVD Decrypter compare the burned data with the image on your harddisk. I suggest you use it, especially if you're not using major brand media, and if are burning at speeds higher than what was specified for the disc you are using.
Recording Speed allows you to set the speed at which DVD Decrypter will
write the image. MAX will obviously use the highest possible recording
speed. With modern burners, this can often mean the disc is written at higher
speeds than it was specified (for instance, many 4x certified blanks can be
written at 8x, and many 8x certified blanks can be written at 16x). Increasing
the burning speed, especially if you're not using the very best media, can be
dangerous, and even the best 8x discs burned at 16x can easily get corrupted.
Hence I suggest that you limit the recording speed to what your empty disc was
made for. I know it takes longer, but a year from now when you can't read your
cheap 8x blanks that you burned at 16x, you might regret not listening to me
;)
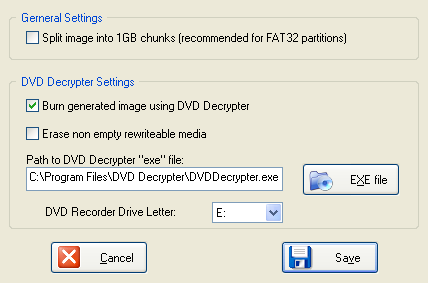
The first time you start up ImgTool, or when you press Settings - Program
Settings, you can configure ImgTool for automatic burning:
 If
you have a FAT32 partition, check Split image into 1 GB chunks to make
sure you won't have any problems with images larger than 4 GB (FAT32 can't handle
files larger than 4 GB).
To enable automatic burning after image creation, check Burn generated image using DVD Decrypter. If you're working with rewriteable media and are not afraid of overwriting any existing content on a disc, you can also check Erase non empty rewriteable media, and thus ensure that burning will start even if you insert a disc that already contains some data.
To use DVD Decrypter, you have to select the DVD Decrypter executable, by pressing the EXE file button and selecting your DVDDecrypter.exe file.
Finally, you have to select the drive letter of your DVD burner. Then press
Save to save the options.
Back in the main window, press he Image button to get started. If you want to shut down the PC after burning, also check Shutdown Windows after recording prior to pressing the Image button.
This document was last updated on August 9, 2005