 As
you can see this mode is pretty straightforward. By default DVD Decrypter will
select the main movie VOB files and the corresponding IFO file. If you need
more files just click on them and they will be marked blue.
As
you can see this mode is pretty straightforward. By default DVD Decrypter will
select the main movie VOB files and the corresponding IFO file. If you need
more files just click on them and they will be marked blue.DVD Decrypter guide
A long time has passed since I wrote the last DVD Decrypter guide so I decided to write a completely new one. By now DVD Decrypter is the most complete ripper - despite what the outdated ripper comparison says - and it can do much more than rip. It can do various things with your DVD drives as changing the region, create an image of any DVD disc that you can mount as a virtual disc drive using tools like Daemon Tools, and it can even write these DVD images (provided they fit onto a DVD-5).
Before we start DVD Decrypter requires that you have an ASPI layer installed. If you get an error message like "ASPI Initialization failed" upon starting up DVD Decrypter you have to install an ASPI layer before you can continue.
DVD Decrypter has 3 basic modes of operations: File mode, which handles each VOB file separately, pretty much the same way since version 1.0. Ifo Mode is new since version 3.1.0.0 and finally delivers IFO parsing that other rippers have offered for a long time. Then there's the ISO mode which allows you to create images and write images. In the following I will explain all modes of operation.
The file mode can be selected by pressing F after starting DVD Decrypter.
As
you can see this mode is pretty straightforward. By default DVD Decrypter will
select the main movie VOB files and the corresponding IFO file. If you need
more files just click on them and they will be marked blue.
Then you can start the ripping process by pressing the large DVD button. If you want to change the destination path clock on the small Windows Explorer symbol in the Destination part of the GUI (to the left of VTS_01_4.VOB in this screenshot).
But you can do more: Right click on a VOB file and you'll get the following:
 Decrypt
would start decrypting right away, Decrypt From would allow you to start decrypting
from a PGC that you can select. So for instance you could skip a studio logo
in the beginning. However, in such a case you should rather switch to the IFO
mode as there might be stuff after the main movie. Properties shows some
basic properties of the VOB files and Stream Processing allows you to select
which streams are being ripped and you can also extract certain streams to a
separate file using it:
Decrypt
would start decrypting right away, Decrypt From would allow you to start decrypting
from a PGC that you can select. So for instance you could skip a studio logo
in the beginning. However, in such a case you should rather switch to the IFO
mode as there might be stuff after the main movie. Properties shows some
basic properties of the VOB files and Stream Processing allows you to select
which streams are being ripped and you can also extract certain streams to a
separate file using it:
 Here's
the menu you'll get when clicking on Stream Processing. Uncheck the streams
you don't want in the output. If you want to save the 2nd audio stream (0x81)
to a separate file click on 0x81, then check Demux to new file rather than the
default Include in VOB.
Here's
the menu you'll get when clicking on Stream Processing. Uncheck the streams
you don't want in the output. If you want to save the 2nd audio stream (0x81)
to a separate file click on 0x81, then check Demux to new file rather than the
default Include in VOB.
You can also remap streams. Let's say you don't want audio stream 0x80, so you would uncheck it, then click on 0x81 and select Map to 0x80 so it will be the first stream (some programs can't handle VOBs that don't have a 0x80 audio stream). If stream processing confuses you don't use it.. it's not really necessary and in the age of 100GB HDs what's a couple 100 MBs anyway? ;)
Last but not least there Settings Menu (Tools - Settings) which is explained
on another page as it's not needed very often. And then there's a couple
of useful things that apply to all operation modes, like the logfile.
Now let's proceed to the IFO mode. Needless to say that if you use the File mode this is the end of the guide for you ;)
The IFO mode can be accessed pressing I once the program has been started.
 If
you've used an IFO parsing capable ripper before this will be straightforward
for you.
If
you've used an IFO parsing capable ripper before this will be straightforward
for you.
First we have the PGC list. If your disc has multiple VTS sets you'll see more in the list than in the screenshot, but by default the main movie will be checked so you don't have to worry. If you have a couple of very long PGCs in the same VTS set you probably have a multiangle or seamless branching disc. In this case select the PGC that corresponds to your needs (for instance in Independence Day the longer PGC would give you the director's cut and the shorter one the theatrical edition).
The list of chapters is also pretty straightforward. By default all the chapters are selected, if you only want to rip a certain amount of chapters just uncheck the ones you don't want. As for cells, don't touch them until you know what you're doing.
Now you can start ripping by pressing the large DVD button. But what if you want to only rip one audio stream, or extract audio streams to separate files? That's where Stream Processing comes in. Click on the Stream Processing tab:
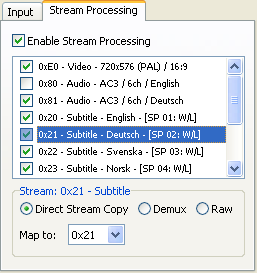 To
enable stream processing you first have to check Enable Stream Processing.
To
enable stream processing you first have to check Enable Stream Processing.
Here DVD Decrypter will list all available streams in the currently selected PGC. If you don't want the output to include a certain stream just uncheck it. In the screenshot I've unchecked the stream 0x80 (first audio stream) so my output VOB would only contain the 2nd audio stream. By default all streams are set to Direct Stream Copy so they will all be in the output VOB. If you want to extract one stream to a separate file you have to check Demux instead:
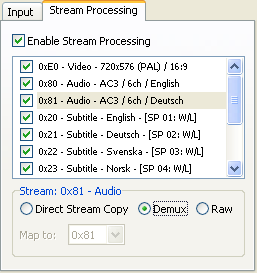 The
configuration shown would demux the 2nd audio track, so you'd get a VOB file
as output containing all but the 2nd audio track, and an AC3 file - the 2nd
audio track.
The
configuration shown would demux the 2nd audio track, so you'd get a VOB file
as output containing all but the 2nd audio track, and an AC3 file - the 2nd
audio track.
Once you've enabled stream processing you'll be shown some additional information
about a stream if you hover over the stream with your mouse.
Once the ripping process has finished and you have enabled stream processing
you'll find an additional txt file in the output folder. Opening it you'll get
something like this:
0x20 - SUBTITLE / Delay: -66ms
0x21 - SUBTITLE / Delay: -66ms
0x80 - AC3 - 6ch / 48kHz / DRC / Delay: -67ms
0x81 - AC3 - 6ch / 48kHz / DRC / Delay: -67ms
The delay values can be useful for synchronization purposes. For instance if you extract the 2nd audio stream to an AC3 as illustrated above you'd have to set the delay in your audio encoding program to -67ms to get video and audio in synch.
Last but not least there Settings Menu (Tools - Settings) which is explained on another page as it's not needed very often. And then there's a couple of useful things that apply to all operation modes, like the logfile.
Now let's proceed to the ISO mode. If you use the IFO mode this marks the end of the guide for you ;)
There's actually 2 ISO modes, one for writing and one for reading. First let's have a look at the reading mode which can be accessed by pressing R once DVD Decrypter has been started.
 DVD
Decrypter will show you all kinds of info about the disc that's currently in
your drive. Most of it is not really important but there's one thing that plays
an important role if you plan to burn the image file to a recordable DVD disc
later on. If Number of Layers equals 2 then you cannot burn the ISO since DVD
blanks only have one layer.
DVD
Decrypter will show you all kinds of info about the disc that's currently in
your drive. Most of it is not really important but there's one thing that plays
an important role if you plan to burn the image file to a recordable DVD disc
later on. If Number of Layers equals 2 then you cannot burn the ISO since DVD
blanks only have one layer.
But to simply have a complete DVD backup on your HD that doesn't matter.
Either way you can start ripping by pressing the large DVD button. Or if you want to change the output path and filename click on the Windows Explorer like button first and set a filename/path.
Once you're done you can mount the ISO as virtual DVD disc using a tool like
Daemon Tools. But let's have a look
at how to burn a DVD image:
In order to access the ISO writing mode press W.
 First
click on the Windows Explorer like button in the left part of the GUI to select
the image file to be burned. On the right side DVD Decrypter will indicate some
info about the disc that's currently in the burner. If the disc is not empty
the button to burn (once again a DVD button) will not be active.
First
click on the Windows Explorer like button in the left part of the GUI to select
the image file to be burned. On the right side DVD Decrypter will indicate some
info about the disc that's currently in the burner. If the disc is not empty
the button to burn (once again a DVD button) will not be active.
If your drive supports BURN-Proof you should check this option, if you want to test-burn also check Test Mode. In that mode the burning process is only simulated and no data will be written to the disc.
Finally we have the Write Speed setting. Leaving it at max will burn the image as fast as your burner and media allows. If you rather like to burn slower, you can also select a lower burning speed than your drive / media combo is capable of. Note that selecting a speed that is higher than your drive / media allows will result in the disc being burned as fast as both drive and media can handle.
Once you've set everything up press the DVD button to start burning.
Last but not least there Settings Menu (Tools - Settings) which is explained on another page as it's not needed very often. And then there's a couple of useful things that apply to all operation modes, like the logfile.
There's a few operations that apply to every mode of operation.
The log: By pressing L the log will be shown. Everything DVD Decrypter does will be logged which allows you to easily identify any problems there might be. The log is also a very useful tool when reporting errors so don't forget to check it before you report an error and include the error reported in the log to your report ;)
 This
is just an example of the log output I got while preparing an update to the
DVD Ripper comparison. As you can see no errors so I'm happy :)
This
is just an example of the log output I got while preparing an update to the
DVD Ripper comparison. As you can see no errors so I'm happy :)
Then there's the popup menu you get when you right click on the Source drive
in any of DVD Decrypter's modes of operation.
 Most
of these options do not really require any explanation. Erase Disc is
of course only useful for DVD recorders and only rewritable discs.
Most
of these options do not really require any explanation. Erase Disc is
of course only useful for DVD recorders and only rewritable discs.
Capabilities will show you what the currently selected drive can do
and finally we have the Regional code submenu that allows you to display
the current drive region (if your drive is region free you'll get an error but
that's nothing to worry about) and to change the drive region. Use this feature
with the utmost care.. if your drive is region locked you only have 5 changes
and then that's it. If your drive is region locked you'd better make
it regionfree.
Last but not least we have some region patching tools that can be accessed via
Tools - IFO:
 Region
Information allows you to select any IFO file and display its region.
Region
Information allows you to select any IFO file and display its region.
Region patch allows you to modify the region information of any given IFO file (of course the file must be writeable so you can't change the region of IFO files on a DVD disc).