 Use the
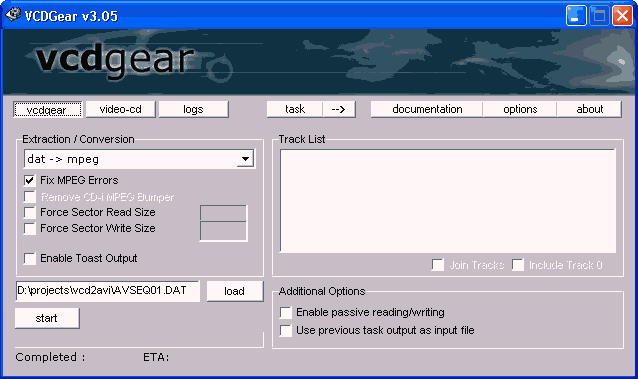
load button to select your .dat file, then select dat -> mpeg from the Extraction/Conversion
dropdown list, check Fix MPEG errors and press start to start the conversion.
Use the
load button to select your .dat file, then select dat -> mpeg from the Extraction/Conversion
dropdown list, check Fix MPEG errors and press start to start the conversion.VCD and SVCD on DVD-Rs
DVD-Rs offer 4.7billion bytes of storage space, ample room to put a couple of movies in VCD or SVCD format on them. However, the really cheap DVD blanks that would really make this operation worthwhile - cheap DVD-Rs often don't play on most standalone player - are still quite expensive so I leave it up to you if the explanations below make any economic sense.
DVDs support VCD resolution and MPEG-1 video. They also support mpeg1 layer2 (mp2) audio along with PCM or AC3 audio. The SVCD resolution is not natively supported but there's a trick that makes it possible to still use SVCD data without having to re-encode. But if you're into making a DVDrip from scratch I strongly suggest that you create a true DVD. Using CCE you can achieve much better results at average bitrates that are comparable to SVCD but there will be no compatibility issues - not all players can handle SVCD content on DVD-Rs properly - and the higher maximum bitrate roof will leave you with an ample amount of bits to make even tough scenes look good.
You'll need the following software for this guide:
TMPG
VCDGear
DVDPatcher
BeSweet and GUI
Step 1: Prepare the sources
In case of an already burned VCD you'll have a couple of AVSEQ01.DAT files, one for each CD. Copy them to your harddisk, then start up VCDGear. If you have a VCD in .mpg format or an SVCD just copy the files to your HD and skip the VCDGear step.
 Use the
load button to select your .dat file, then select dat -> mpeg from the Extraction/Conversion
dropdown list, check Fix MPEG errors and press start to start the conversion.
Repeat this step for all .dat files you have.
By now you have a series of AVSEQ01.MPG files. If you
have an authoring program that allows you to append video sequences then you
can skip the next step, otherwise you'll have to join the mpeg files to get
a single one. Especially cheaper DVD authoring tools do not support track appending
so you would have to select the part of the movie that was on the 2nd/3rd disc
manually via the menu which isn't so much fun.
Step 2: Appending and Splitting
TMPG is the easiest solution for this. If this should not work you will have to resort to commercial programs like Myflix, M1-edit, mpegvcr for MPEG-1 or M2-edit / mpeg2vcr for MPEG-2. These tools are outside the scope of this guide.
Start up TMPG, select File - MPEG Tools and click on the Merge&Cut tab.

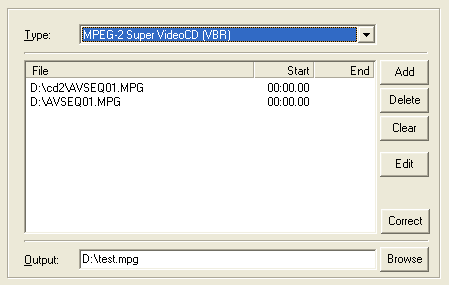
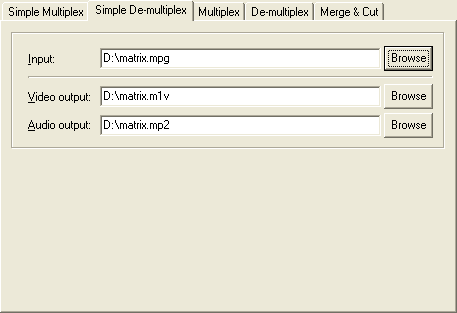
Load up all your files in the right order, select a name for the output file, then press the run button. This will take a while and TMPG will most likely behave as if it had frozen, but as long as you see the output file growing everything is in best order. Once the merging operation has completed click on the simple demultiplex tab.
 Select
the file that you've just created as input file, then press Run to demultiplex.
Once again TMPG will behave as if frozen.
Step 3: Renaming and MPEG-2 trickery
By now you have one .mp2 audio file and one .m1v (VCD) or .m2v (SVCD) file.
If you have an SVCD we have another thing to take care of: The default SVCD solution is not compatible to DVD. However, if your player can handle SVCDs it should be able to handle DVDs with SVCD content, but the authoring software will refuse to load these MPEG-2 files. Therefore we have to make the authoring software believe that the video file has a valid dimension when first loading it. In order to do that start up DVDPatcher and load your MPEG-2 file.
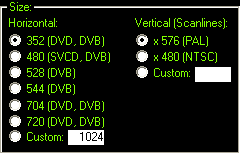
 All
you have to change is shown on the left. The vertical resolution can be left
untouched, but you have to change the horizontal resolution from 480 to 352.
 Make
sure that Entire file is checked, then press Patch now! and Start in the window
that comes up. That's all the magic needed to make your authoring program accept
the SVCD video.
There's one more thing not to be forgotten: After compiling your project, you
will have to start DVDPatcher again, load the first VOB file and reset the horizontal
size to 480. Repeat this for ever VOB file. Do NOT forget to do this!
Step 4: Re-encoding the audio
I'm afraid there's no way around this one. VCDs and SVCDs are usually made using 44.1KHz audio and this sampling rate is not allowed on DVDs. If you're lucky you've read my tips on 48KHz in the (S)VCD guides and have not bothered to downsample, in this case this whole step does not have to be performed. But if you have a specs compliant (S)VCD you will have to do it - and lose quality in the process.. there's no lossless re-encoding.
If you want to keep your audio as an MP2, check out the MP2 encoding guide. If you prefer to create a 2 channel AC3, check out the AC3 encoding guide.
If you've just created an MP2 file, rename it to .mpa. It is imperative that the name before the dot of audio and video files match as cheaper DVD authoring programs (as we're going to use later in this guide) will only load the audio if the name corresponds to one of the video files.
By now our sources are ready to be loaded into a DVD authoring program and you're ready to author a DVD. For simplicity I've chosen SpruceUp to demonstrate basic DVD authoring. Of course there's other options as well but SpruceUp is nice and very simple and I don't want to bother the average VCD or SVCD user with high end DVD authoring stuff.
This document was last updated on April 12, 2009