 In
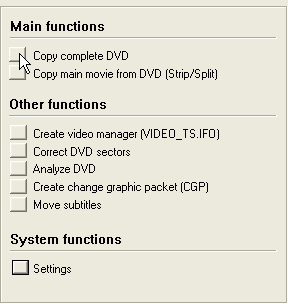
the main window you have a list of things DVDFab can do. Before we proceed by
clicking on Copy complete DVD let me quickly guide you through the Other
functions:
In
the main window you have a list of things DVDFab can do. Before we proceed by
clicking on Copy complete DVD let me quickly guide you through the Other
functions:DVDFab - Full DVD Split Guide
DVDFab - formerly known as DVDToolbox (the name has been changed to avoid a naming conflict with existing tools) - is, according to the author, a tool supposed to be a free and 100% working copy of DVDXCopy. As you may know, DVDXCopy was the first commercial tool to split commercial DVD-9s to two DVD±Rs. It was initially pretty buggy but the company behind it eventually hired the author of IfoEdit to improve it - which has effectively killed of any further IfoEdit development. That, and the fact that the company is selling a package of freeware tools and a guide to create (S)VCDs has not earned them many friends so many people have avoided using DVDXCopy and were stuck with IfoEdit to do the same. While IfoEdit does the job just fine, it's a pretty complex operation. That's where DVDFab comes in handy. Its splitting facilities are extremely easy to use, though at the moment still not offering all the functionality DVDXCopy and IfoEdit can offer - but that is bound to change eventually.
You'll need the following software for this guide:
DVD Decrypter
DVDFab
Step 1: Rip the DVD (Optional)
There are two ways you can use DVDFab: The "normal" way consists of ripping a DVD to your harddisk, then process it. Alternatively, there's a 3rd party plugin enabling DVDFab to read CSS encrypted content directly off your DVD disc. The latter obviously requires less HD space and should be somewhat faster, though if anything should happen and you'd have to restart the operation, having the DVD ripped is a definitive advantage.
Anyway, if you want to rip the DVD to your HD first, start up DVD Decrypter, press F to go to file mode, select all files and press the big button containing a DVD disc, an arrow and a harddisk symbol. For more information on this procedure please refer to the DVD Decrypter guide.
If using the CSS plugin, copy the dll file to your DVDFab directory (normally c:\program files\dvdfab).
Step 2: Split the DVD
Start up DVDFab.
 In
the main window you have a list of things DVDFab can do. Before we proceed by
clicking on Copy complete DVD let me quickly guide you through the Other
functions:
Create video manager will create the required VIDEO_TS.* files if you only have a set of VTS_0x_y.* files. You can use this feature to create your own trailer DVD based on VOB files you have downloaded from the Internet, just as an example.
Correct DVD sectors is the equivalent to Get VTS Sectors in IfoEdit. If you change anything in a DVD's structure, certain file pointers will no longer be accurate (if you have removed say an FBI warning clip and tried to play the disc without making any adjustments, the player would try to find that FBI warning clip in vain and could not proceed) and you have to correct them using the Correct DVD sectors function.
Analyze DVD does just what the option says: DVDFab will process all files from a DVD and present you some detailed statistics. This function is very useful when trying to find out how big a DVD will be if you remove certain items from it - audio and subtitle tracks for instance.
Create change graphic packet allows you to create your own "Please insert disc2" graphics.
Finally, Move subtitles can be used the change the position of subtitles. Those of you who have certain non 16:9 widescreen movies with subtitles will know that sometimes the subtitles are displayed in a position where you can no longer see them on screen (stretching a 4:3 widescreen picture to fit a 16:9 TV is such a situation). This function allows you to move the subtitles to a position where you can once again see them.
OK, let's proceed now. If you haven't done so yet, click on Copy complete DVD now.
 In
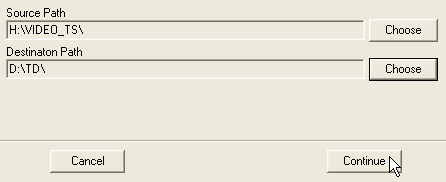
this screen you have to configure source (that is where your DVD data resides)
and destination (where the split DVD will be written to) paths. If you're using
DVDFab with the CSS plugin, make sure you select the VIDEO_TS folder on your
DVD disc, not just the drive letter of your DVD drive.
Once you've configured both paths press Continue.
The next step is selecting a split point:
 DVDFab
will first analyze the entire DVD before showing this screen - this might take
a few minutes.
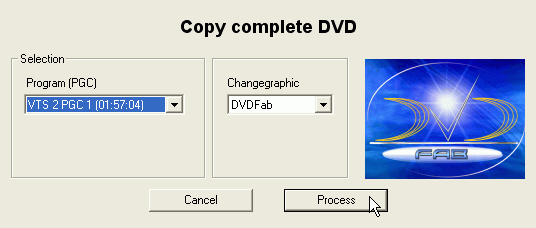
Once you're here, DVDFab will already have chosen a suitable split point for you. At the time I'm writing this, it doesn't make much sense to change the PGC, because if you do, most likely the DVD couldn't be split properly anymore. This is due to the following: DVDFab tries to put all extras from a movie, and the menus on disc1. Then it fills up disc one with as much from the main movie as possible, and puts the rest of the main movie on disc2. On disc2, the movie will start playing directly and there's no menu. If you prefer to have another configuration you'll have to wait until there's a version of DVDFab where you can manually select a split point.
The 2nd choice you can make here is select a changegraphic. This is a set of graphics that is displayed when you have to enter disc2 and at the end of disc2. A default set is provided (a preview is shown on the right of the configuration screen), others are available on the DVDFab website.
Once you've made your choice, press Process.
 This
is it already. DVDFab will now split the DVD according to the rules I outlined
above. It will create several folders in your chosen output folder: disc1 and
disc2, each containing an empty AUDIO_TS and VIDEO_TS folder (the latter is
obviously not empty since it contains the movie).
This document was last updated on April 14, 2009